See Your Hands in XR
⚠ NOTICE |
|
This legacy plugin is no longer being updated and maintained, please develop mobile content with OpenXR 2-in-1 Unity / Unreal package . |
When using VIVE OpenXR SDK, there are two ways to retrieve the hand tracking data in Unity, with the basic plug-in ( Wave.OpenXR ) or the toolkit ( Wave.OpenXR.Toolkit ). In this chapter, I am going to teach you how to use the toolkit, for I believe it is simpler, more efficient and covers most user scenarios. However, if you’re interested in learning the API design of the original plug-in, go check the API Reference .
In the VIVE OpenXR Toolkit , Hand Tracking is defined as 26 joints, as seen below.
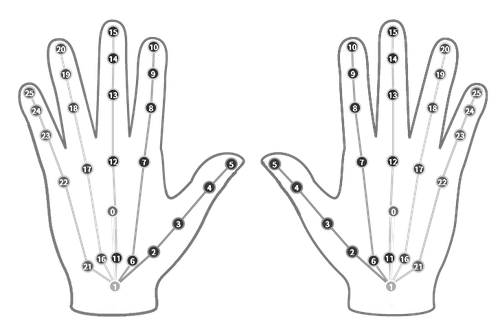
Each joint contains useful information, such as tracking status, position, and rotation.
Step 1. Check your VIVE Wave OpenXR Plugin - Android package version
In order for you to use the
VIVE OpenXR
HandTracking Toolkit
in Unity, remember to check if your
VIVE Wave
OpenXR Toolkit - Android
package version is 1.0.1 or later.

To check it, please visit the API Reference
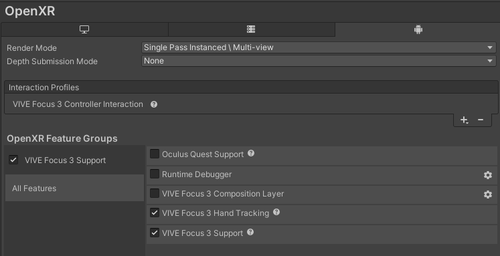
Step 2. Enable the Hand Tracking feature
After updating the
VIVE Wave
OpenXR Plugin - Android
package to a version which supports the Hand Tracking
feature, go to
Project Settings
>
XR Plug-In Management
>
OpenXR
and enable
VIVE Focus 3 Hand Tracking
.
After the setting is done in the Unity editor, we can use the Hand Tracking feature.
Step 3: Create a Rig
3.1
In the editor, create a basic rig like this.
![]()
Remember to attach the TrackedPoseDriver onto the Head , as mentioned in the previous chapter.
3.2
Create two empty
GameObjects
named
LeftHand
and
RightHand
under
Rig
.
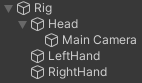
The hand joints will be placed in these two GameObjects .
Step 4. Create a Joint prefab
The joint prefab represents the pose of a joint.
First, create a script called Joint_Movement.cs .
In Joint_Movement.cs , first, we add two namespaces.
using Wave.OpenXR.Toolkit;
using Wave.OpenXR.Toolkit.Hand;
These two namespaces allow us to use the VIVE OpenXR Hand Tracking Toolkit .
The two variables, jointNum and isLeft, tell the script which joint of which hand it should be tracking.
public int jointNum;
public bool isLeft;
In Update(), we’ll make the GameObjects , which the script is attached to, move and rotate according to the data from HandTracking.GetHandJointLocation().
void Update()
{
     HandJoint joint = HandTracking.GetHandJointLocations(isLeft ? HandFlag.Left : HandFlag.Right)[jointNum];
     if (joint.isValid)
     {
          transform.localPosition = joint.position;
          transform.rotation = joint.rotation;
     }
}
Full script:
using System.Collections;
using System.Collections.Generic;
using UnityEngine;
using Wave.OpenXR.Toolkit;
using Wave.OpenXR.Toolkit.Hand;

namespace Wave.OpenXR.Samples.Hand
{
     public class Joint_Movement : MonoBehaviour
     {
          public int jointNum;
          public bool isLeft;
          void Update()
          {
               HandJoint joint = HandTracking.GetHandJointLocations(isLeft ? HandFlag.Left : HandFlag.Right)[jointNum];
               if (joint.isValid)
               {
                    transform.localPosition = joint.position;
                    transform.rotation = joint.rotation;
               }
          }
     }
}
Second, create a simple prefab (a simple ball or cube) named
Joint
, and then attach the
Joint_Movement
script to it.
Step 5. G
enerate
the Hand
We’ll use the Joint prefab created in step 4 to generate the hand model.
Create a second script and name it Show_Hand.cs .
using System.Collections;
using System.Collections.Generic;
using UnityEngine;

namespace Wave.OpenXR.Samples.Hand
{
     public class Show_Hand : MonoBehaviour
     {
          public GameObject jointPrefab;
          public Transform leftHand;
          public Transform rightHand;
          void Start()
          {
               GameObject temp;
               for (int i = 0; i < 26; i++)
               {
                    temp = Instantiate(jointPrefab, leftHand);
                    temp.GetComponent<Joint_Movement>().isLeft = true;
                    temp.GetComponent<Joint_Movement>().jointNum = i;
               }
               for (int i = 0; i < 26; i++)
               {
                    temp = Instantiate(jointPrefab, rightHand);
                    temp.GetComponent<Joint_Movement>().isLeft = false;
                    temp.GetComponent<Joint_Movement>().jointNum = i;
               }
          }
     }
}
Then, attach this script to any GameObject in the scene and remember to assign the variables in the Inspector window.
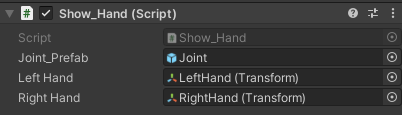
In this script, what we’re doing is simply spawning 26 joints for both hands.
Now, we are ready to go. Let’s build and run this app and see your hands in the XR world.