Basic Input for OpenXR
In this guide, we will cover the uses of the VIVE OpenXR Plugin controllers, including the VIVE Cosmos Controller (Windows only) and the VIVE Focus 3 Controller.
Supported Platforms and Devices
| Platform | Headset |
Plugin Version for
Focus3 Controller |
Plugin Version for
Cosmos Controller |
|
| PC | PC Streaming | Focus 3/XR Elite/Focus Vision |
VIVE OpenXR Plugin 2.0.0
and above |
VIVE OpenXR Plugin 2.0.0
and above |
| Pure PC | Vive Cosmos |
VIVE OpenXR Plugin 2.0.0
and above |
||
| Vive Pro series | ||||
| AIO | Focus 3/XR Elite/Focus Vision |
VIVE OpenXR Plugin 2.0.0
and above |
||
※Correspondent VIVE Streaming settings required.
Specification
This chapter dives into creating immersive experiences with the Input feature. We'll explore its use within the XR_HTC_vive_focus3_controller_interaction and XR_HTC_vive_cosmos_controller_interaction extensions.
Environment Settings
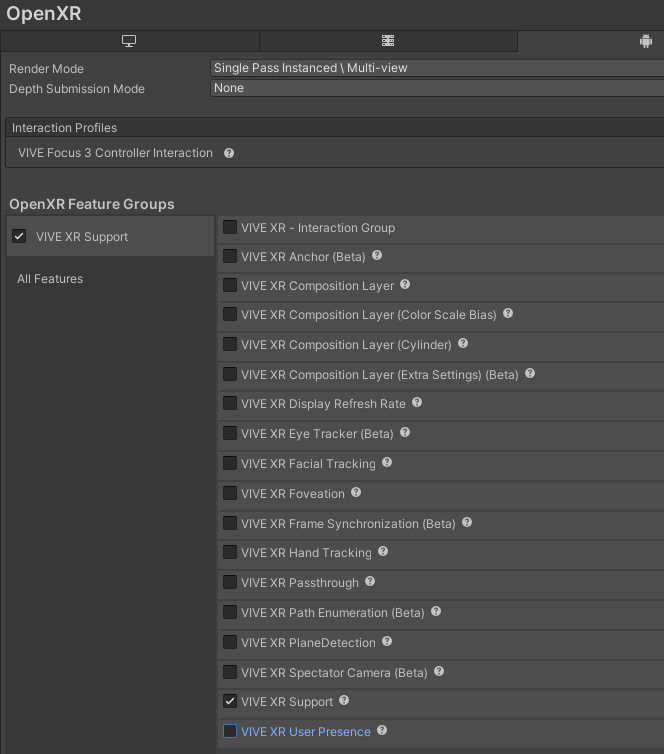
On AIO, you must add the VIVE Focus 3 Controller Interaction extension to Interaction Profiles.
On Windows, you mst add the VIVE Cosmos Controller Interaction extension to Interaction Profiles.
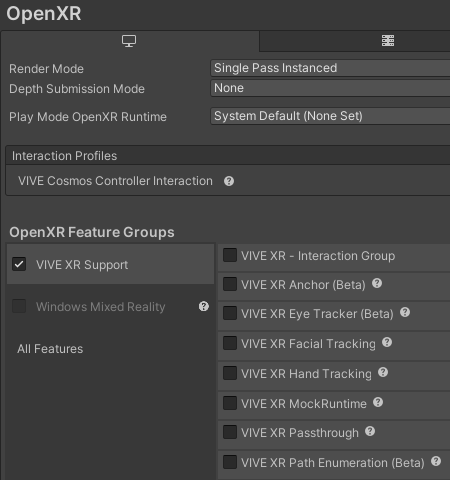
Golden Sample
In Unity, there are two input systems, the old Input Manager and the new Input System. The old Input Manager provides APIs that some Unity users might be familiar with, as shown below.
Input.GetAxis(“Vertical”)

Input.GetKey(KeyCode.UpArrow);

Input.GetButton(“Jump”);
The Input Manager is simple, intuitive and easy to use. However, it also means it is hard for the developer to handle complex input, like supporting keyboards and gamepads at the same time, or to remap the input. To combat these pain points, Unity introduced the new Input System.
In the new Input System, input of devices is bound to actions instead of the code. This way, developers only have to handle the action triggered by the player, without the need of knowing which device or what button the action is associated with (bound to). As a new field with various input devices, it is easy to understand why Unity chose to use the new Input System to handle the input in XR.
Input System-Basic Input
In this chapter, you will learn about the basic input device in all VR headsets - controllers, and how to handle the input from the controllers in Unity using the new Input System. You will learn below contents:
- Basic knowledge of the controller.
- How the Input System works.
- How to use the Input System (Settings and Code) in VR contents.
Create an Action Asset
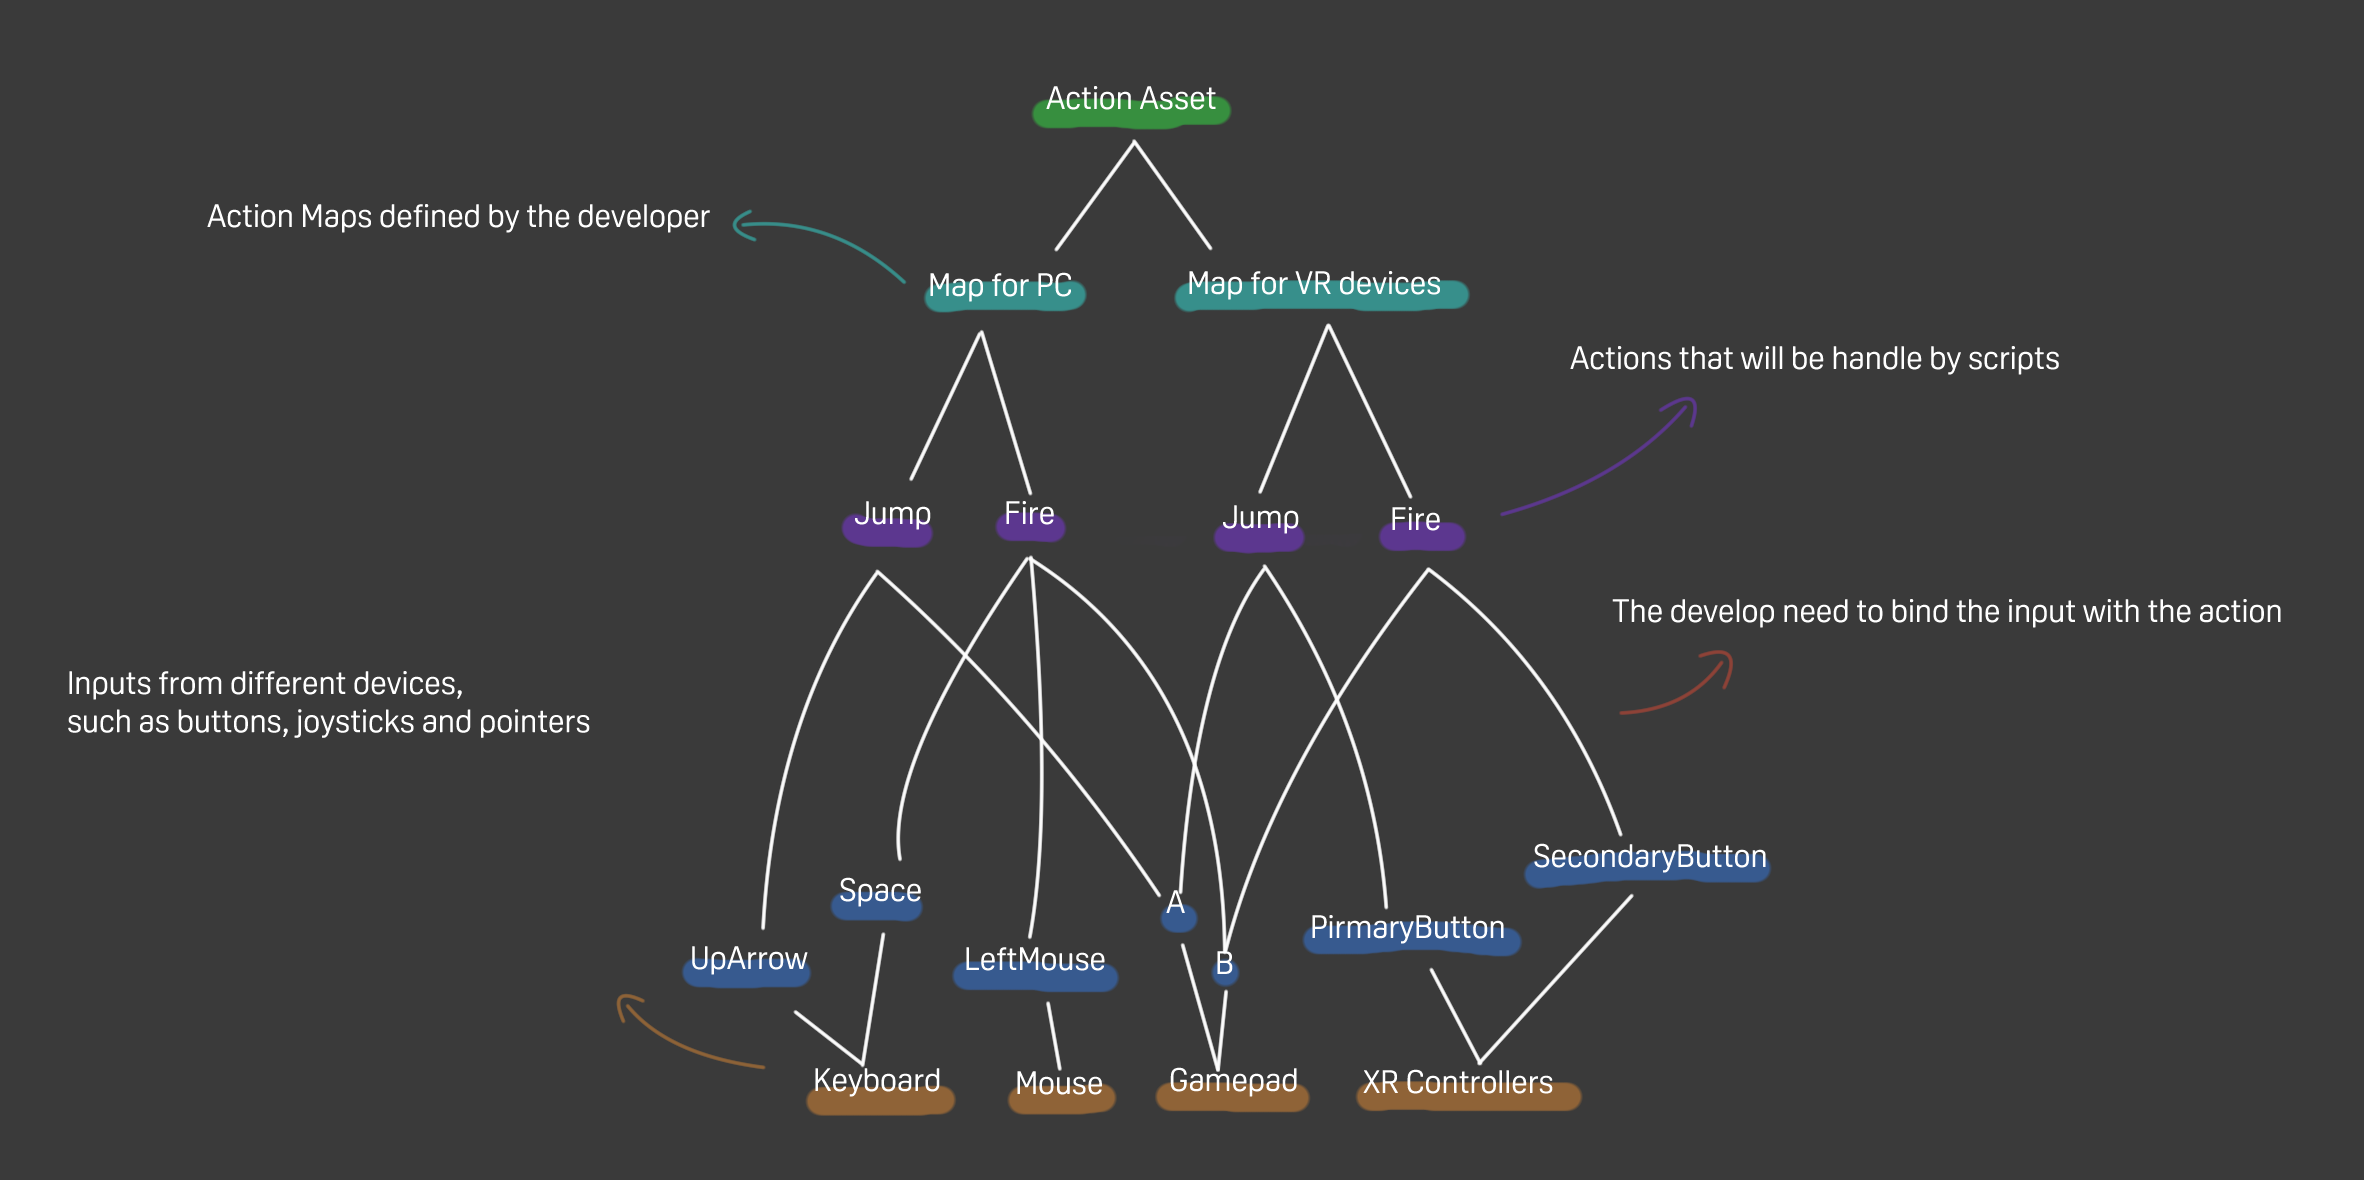
To use Input System, an action asset needs to be created. Action assets are defined by the developer themselves. In each action asset, there are several action maps also created by the developer. In each action map, different actions are created and bound to different input. Instead of handling the device input, the developer only needs to handle the actions in the enabled action asset.
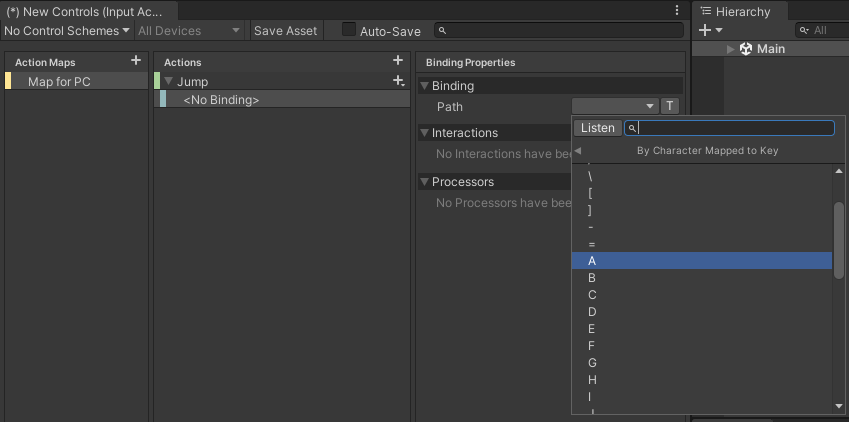
Step 1. Create an action asset
Step 2. Create an action map and an action
Step 3. Bind the action to the A key - Set Path: Keyboard > By Character Mapped to Key > A
Handle input using the action asset
Step 1. Download sample action asset and put the sample action asset into the project
Step 2. Use the InputSystem namespace
using UnityEngine;

using UnityEngine.InputSystem;
Step 3. Declare the ActionAsset and InputActionReference
public class MoveCube : MonoBehaviour {

    [SerializeField] private InputActionReference JoyStitckR;

    [SerializeField] private InputActionAsset ActionAsset;

    private void OnEnable()
    {
        if (ActionAsset != null)
        {
            ActionAsset.Enable();
        }
    }
}
Remember to enable the InputActionAsset before using it.
After the InputActionAsset is enabled, the input data, which is given by the InputActionReference from the action it is associated with, can be used in the script.
Step 4. Link the InputActionAsset with the sample action asset and link the InputActionReference with the action (RightHand/Joystick)

Step 5. Using InputActionReference to get the input value
Now, by using ReadValue<TValue>, the value of InputActionReference can be used in the code.
void Update()
{
    transform.Translate(JoyStitckR.action.ReadValue<Vector2>() * Time.deltaTime);
}
The thumbstick of our controller returns a 2D value, which is held by a Vector2. By giving Translate() the value, we can move the GameObject this script is attached on.
Different Type of Value Returned by the Reference
Different types of actions return different value. For instance, the action we bind the thumbstick with is Vector2.
On the other hand, the action type we bind the buttons to is Button, which returns float. On our controller, buttons only return either 0 or 1.
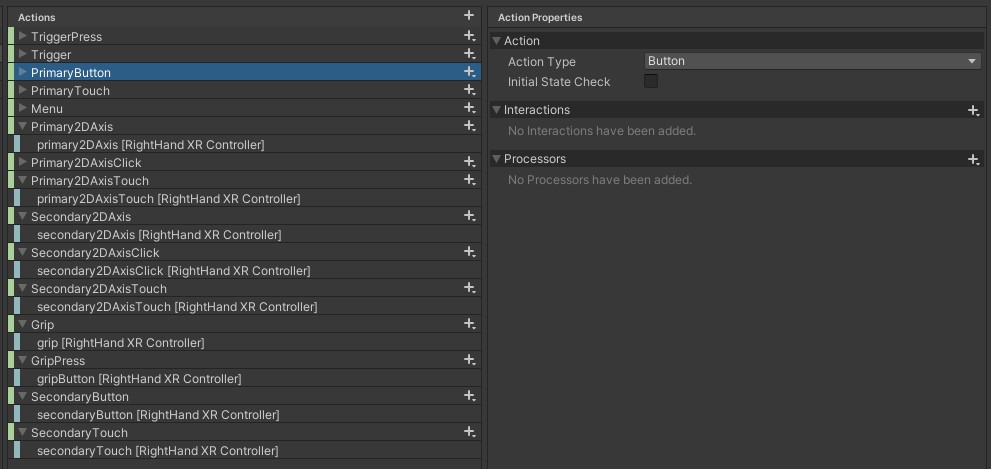
Finally, input such as trigger and grip are bound to Axis, which also return float.
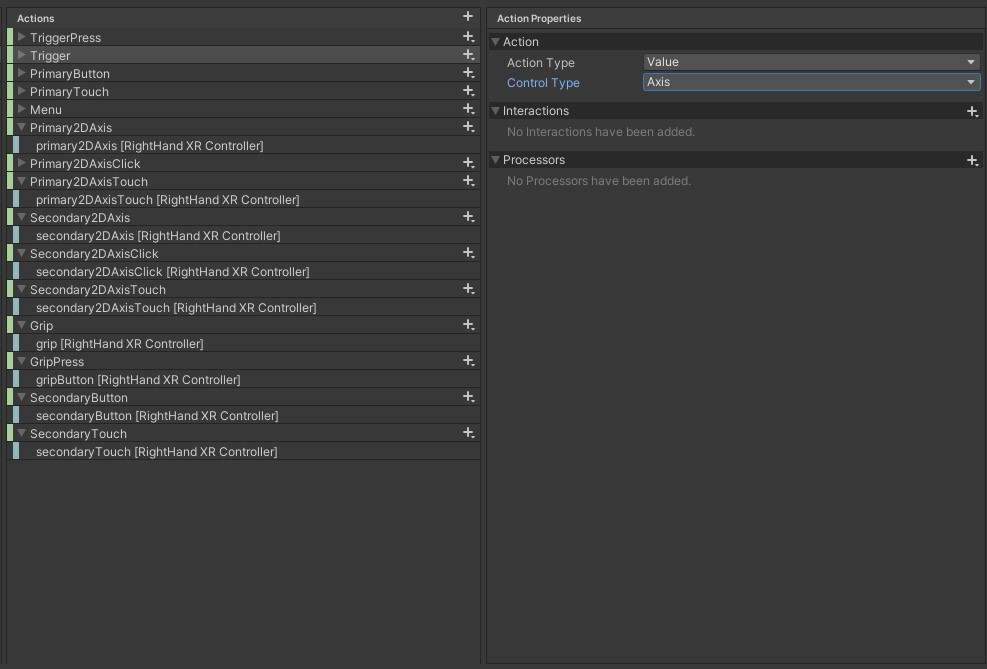
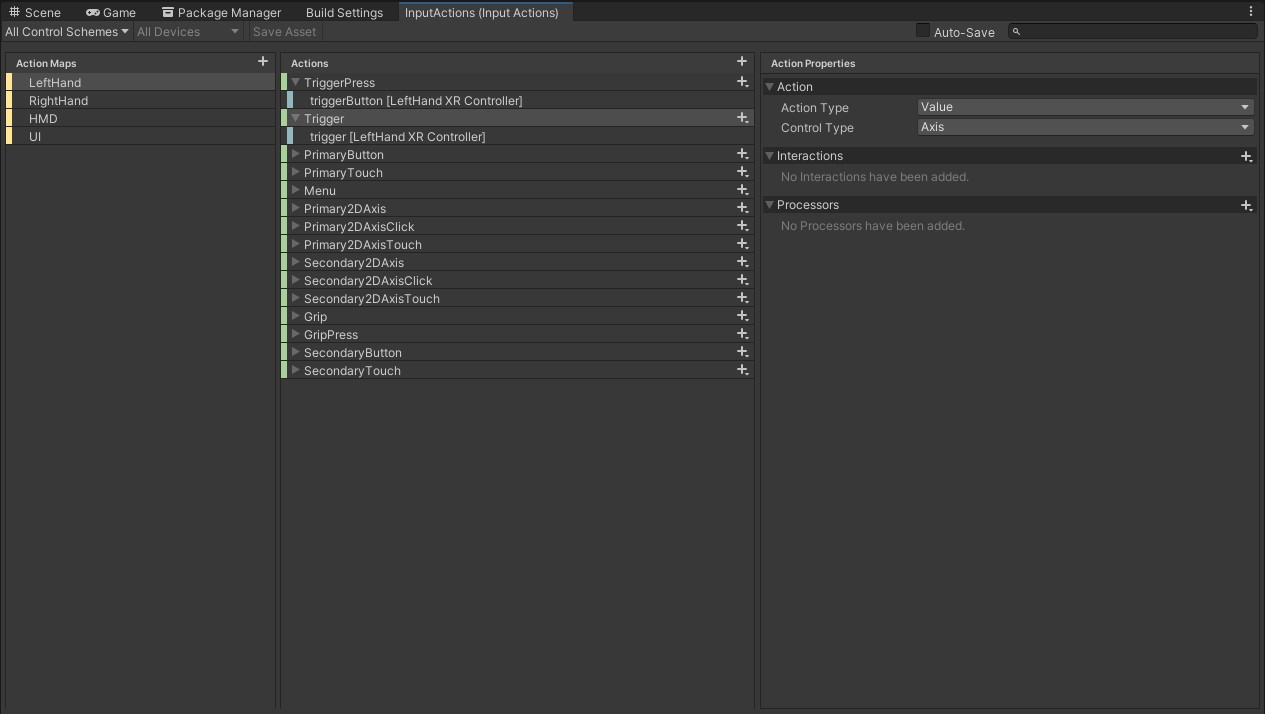
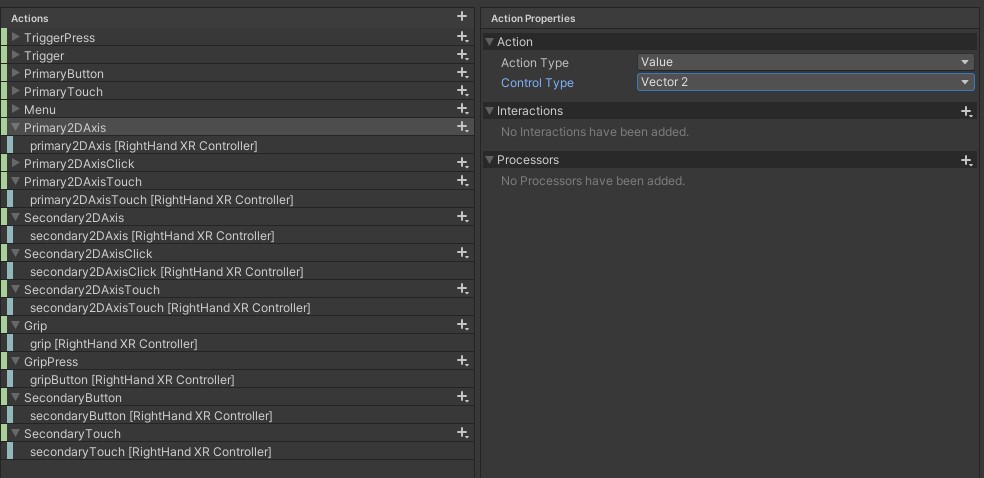
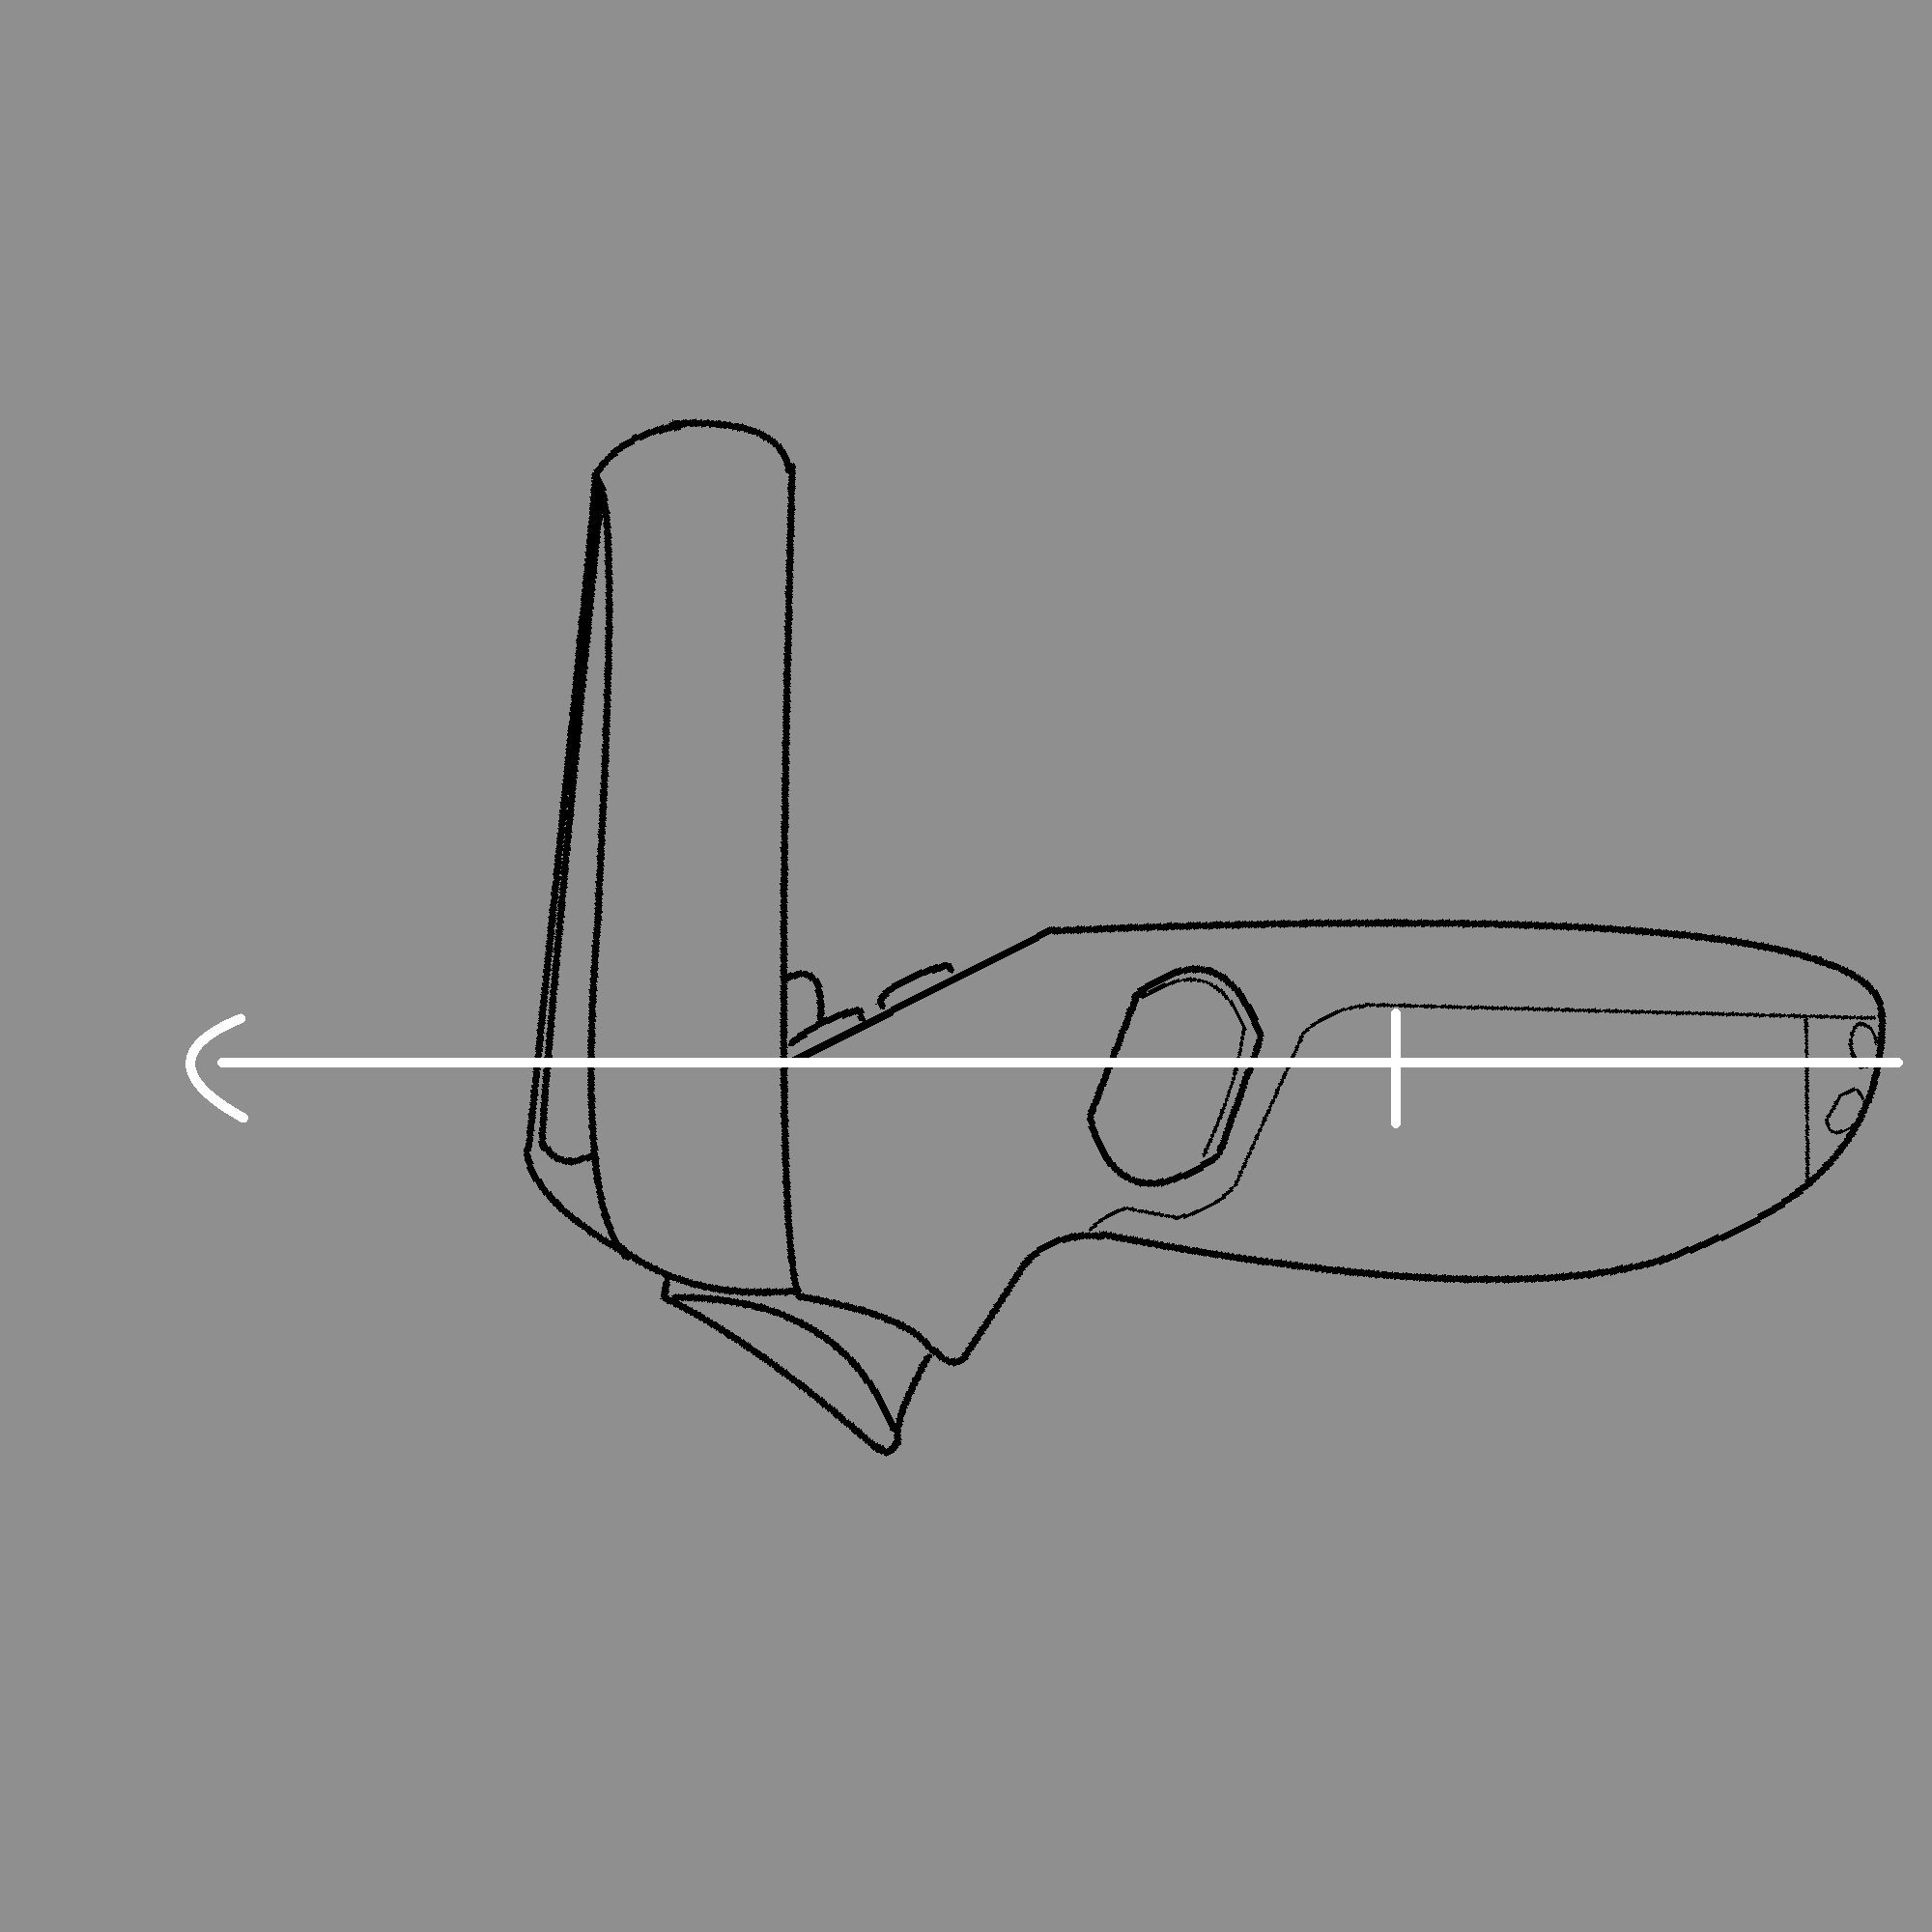
The following are the name of inputs of the controllers and their respective data types.
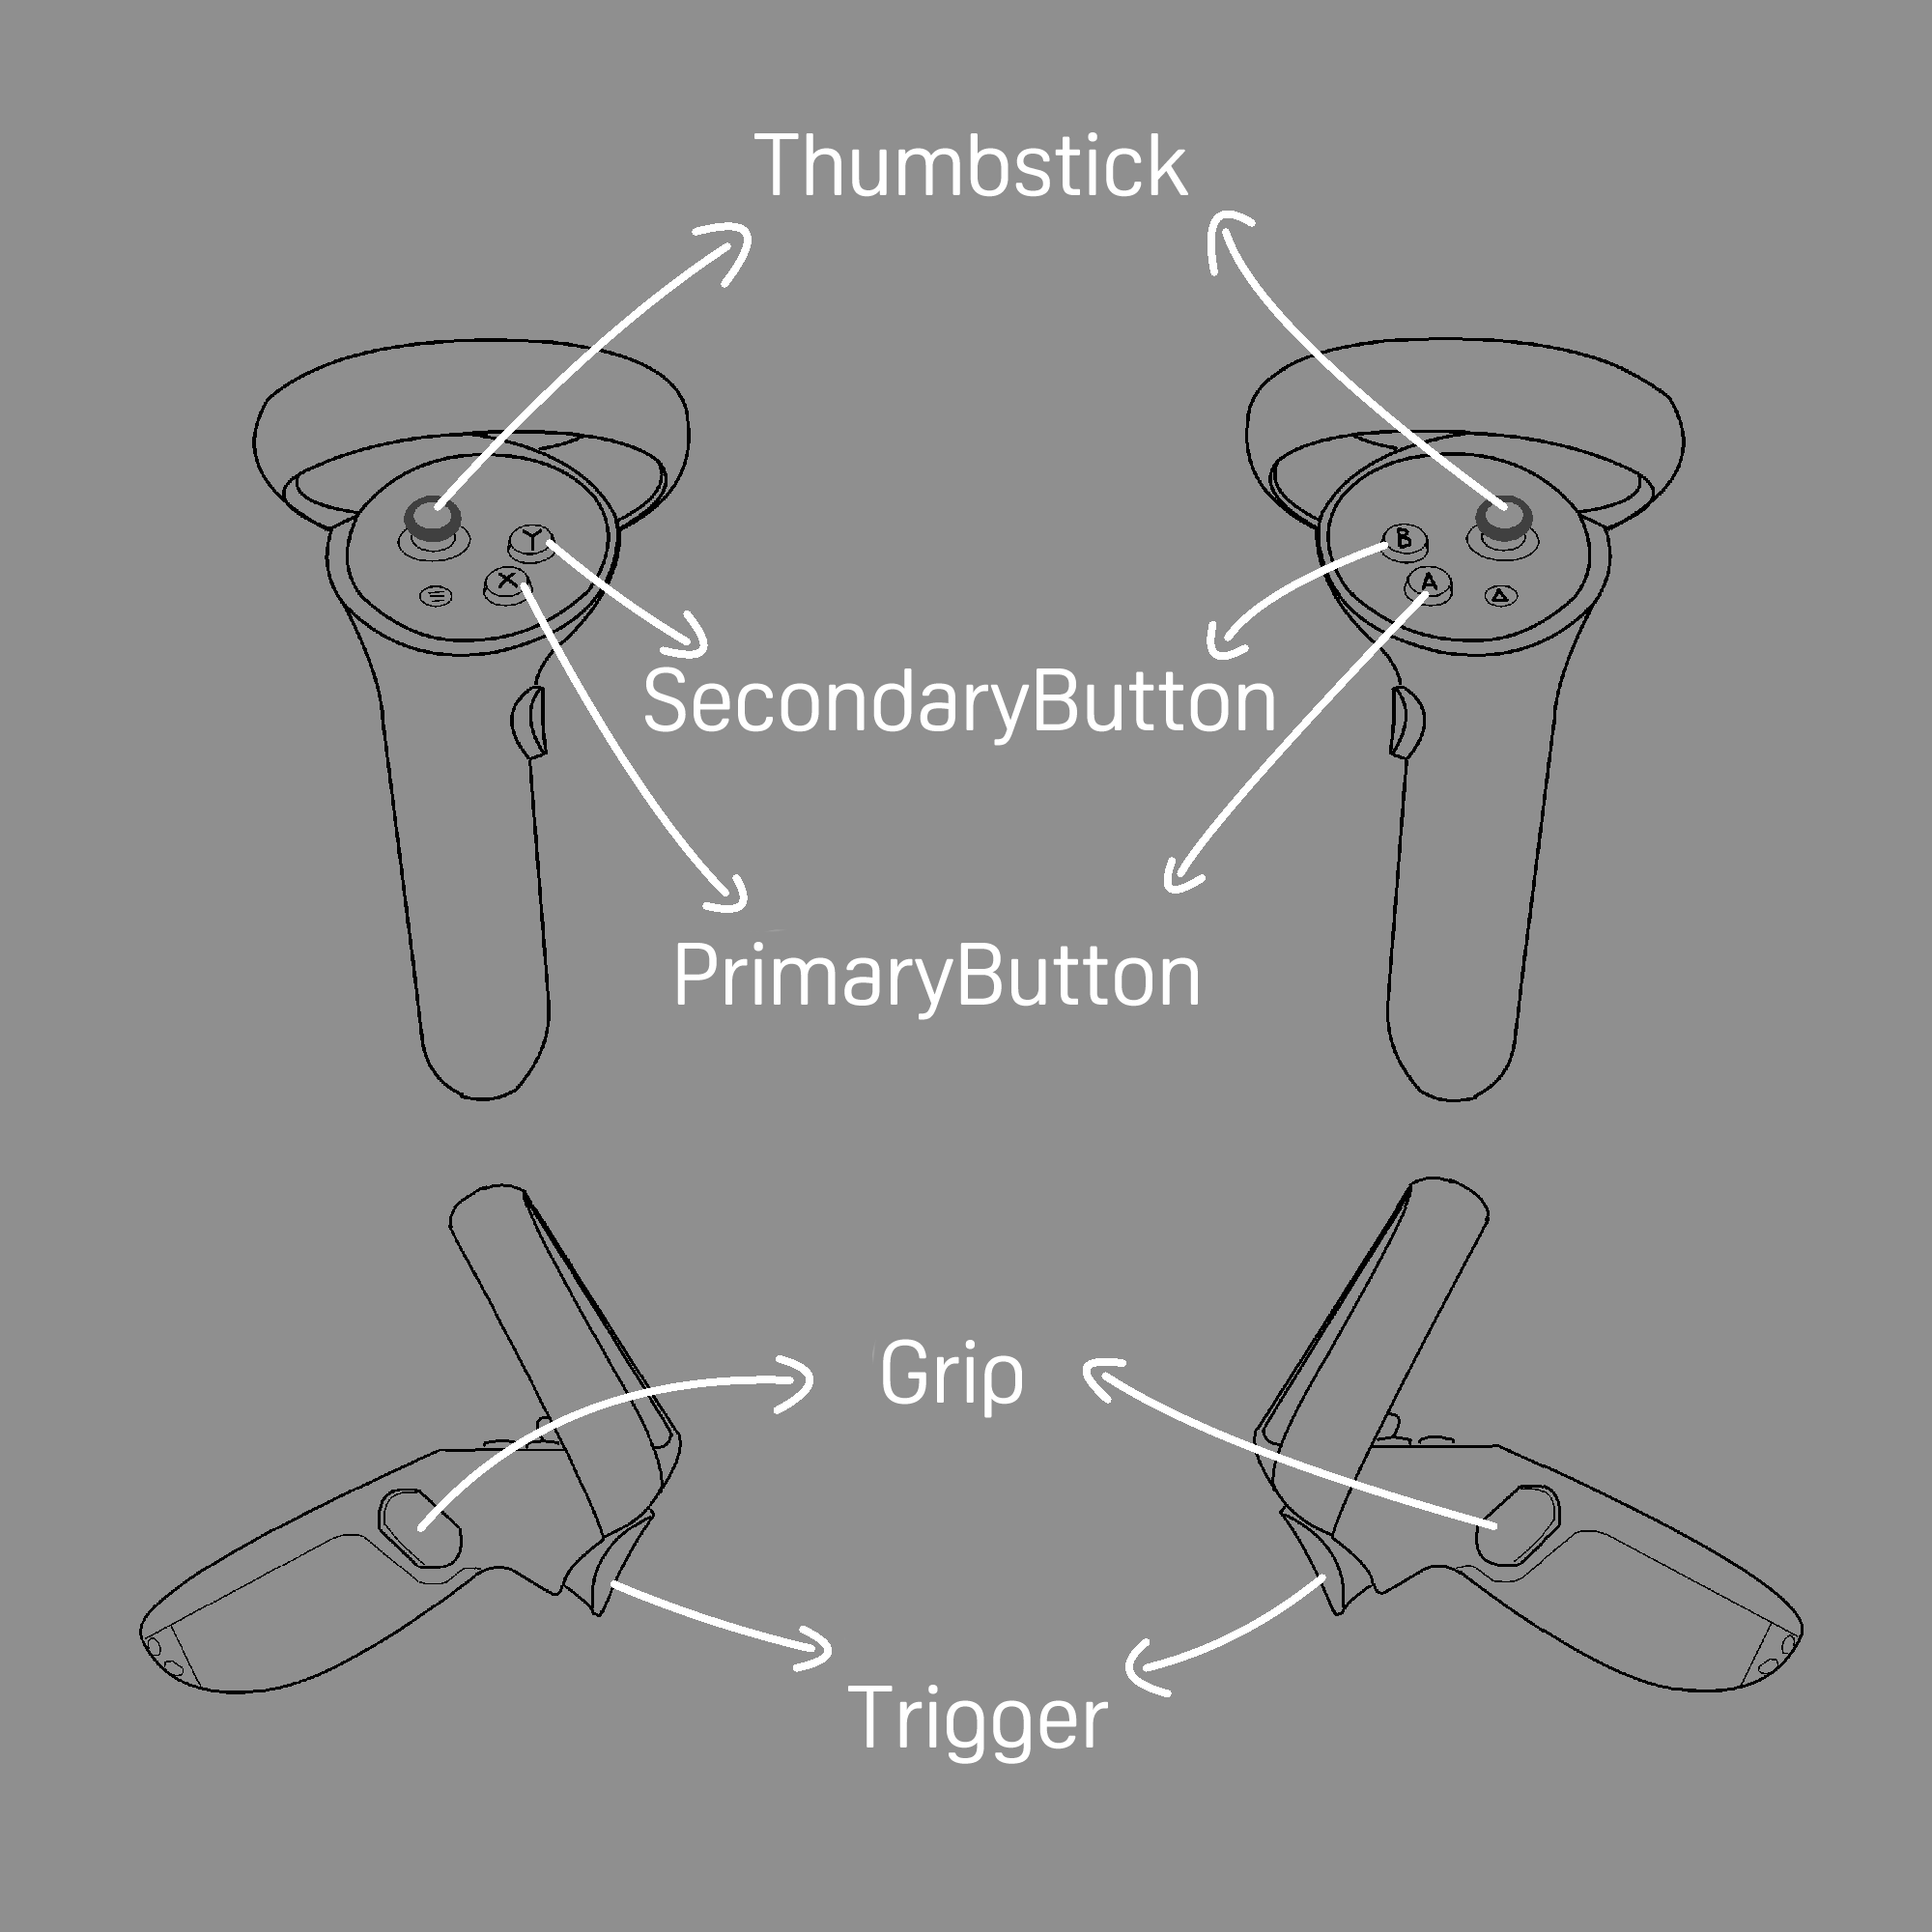
(The name of input of the controller)
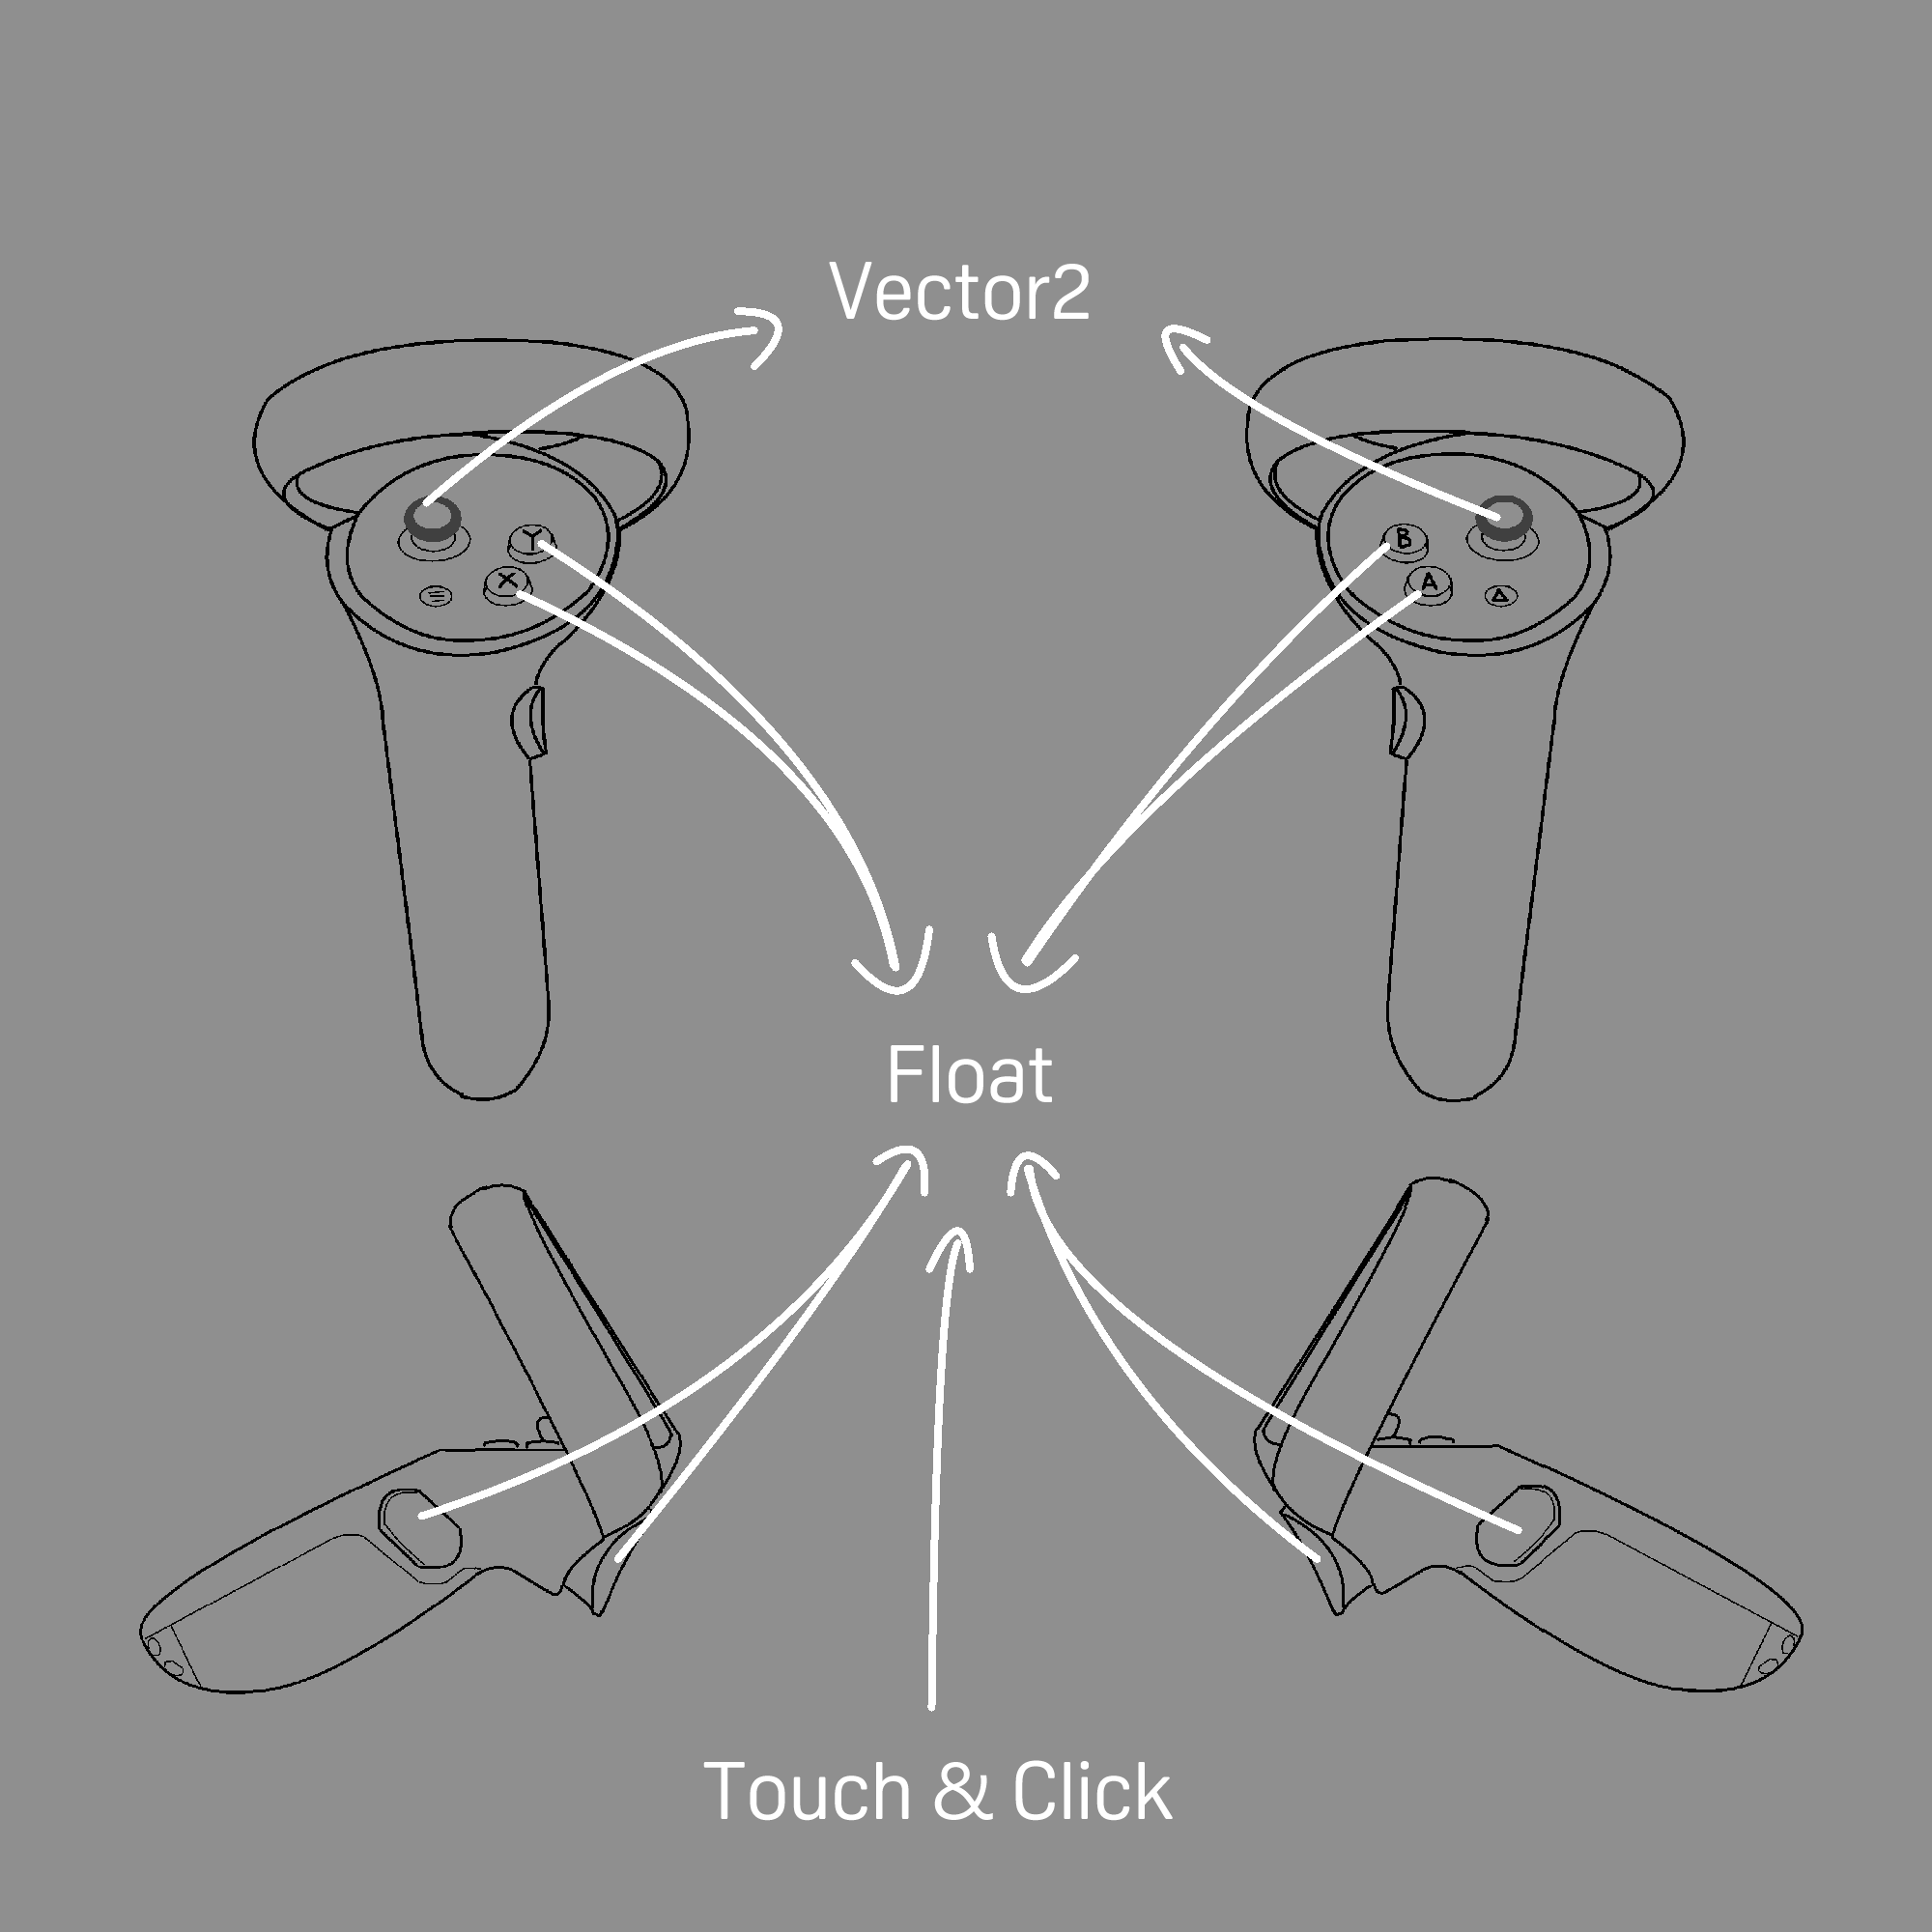
(Notice that we provide input of touching and clicking for grip, thumbstick and trigger)
Aim Pose and Grip Pose
Through Input System, the developer can not only use the typical input values, such as bool, float and axis. Instead, they can also get special input values, such as position and rotation from the device. For example, the following actions return the position and rotation of the headset, which is useful.
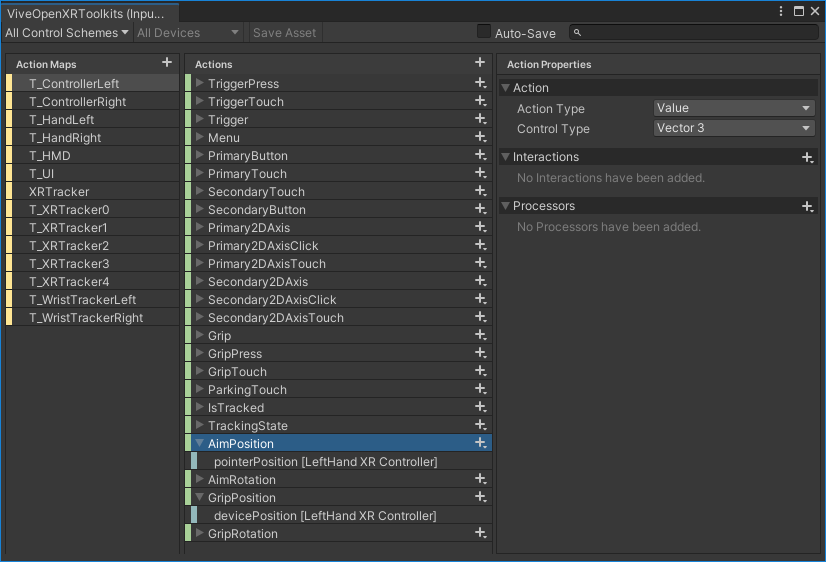
However, when it comes to the controllers, there are actually two pair of position and rotation for each controller. They are called the Aim pose and the Grip pose. Each of them is designed to be used in different situations.
Aim Pose
Aim pose is useful when the developer wants the player to use the controller as a gun.
The origin and facing direction of Aim pose is follows.
public GameObject Bullet_Prefab;
public InputActionReference TriggerR;
public InputActionReference AimDirR;
bool TriggerPressed;
bool TriggerPressing;

void Update(){
    TriggerPressed = (TriggerR.action.ReadValue<float>() > 0.5f) && !TriggerPressing ? true : false;
    TriggerPressing = (TriggerR.action.ReadValue<float>() > 0.5f) ? true : false ;

    if(TriggerPressed){
        Shoot();
    }
}

void Shoot(){
    GameObject _Temp = Instantiate(Bullet_Prefab, transform.position, Bullet_Prefab.transform.rotation);
    _Temp.GetComponent<Bullet>().Movement = AimDirR.action.ReadValue<Quaternion>() * Vector3.forward;
}
(As shown, the rotation of Aim pose is useful for making gameplays such as shooting a bullet)
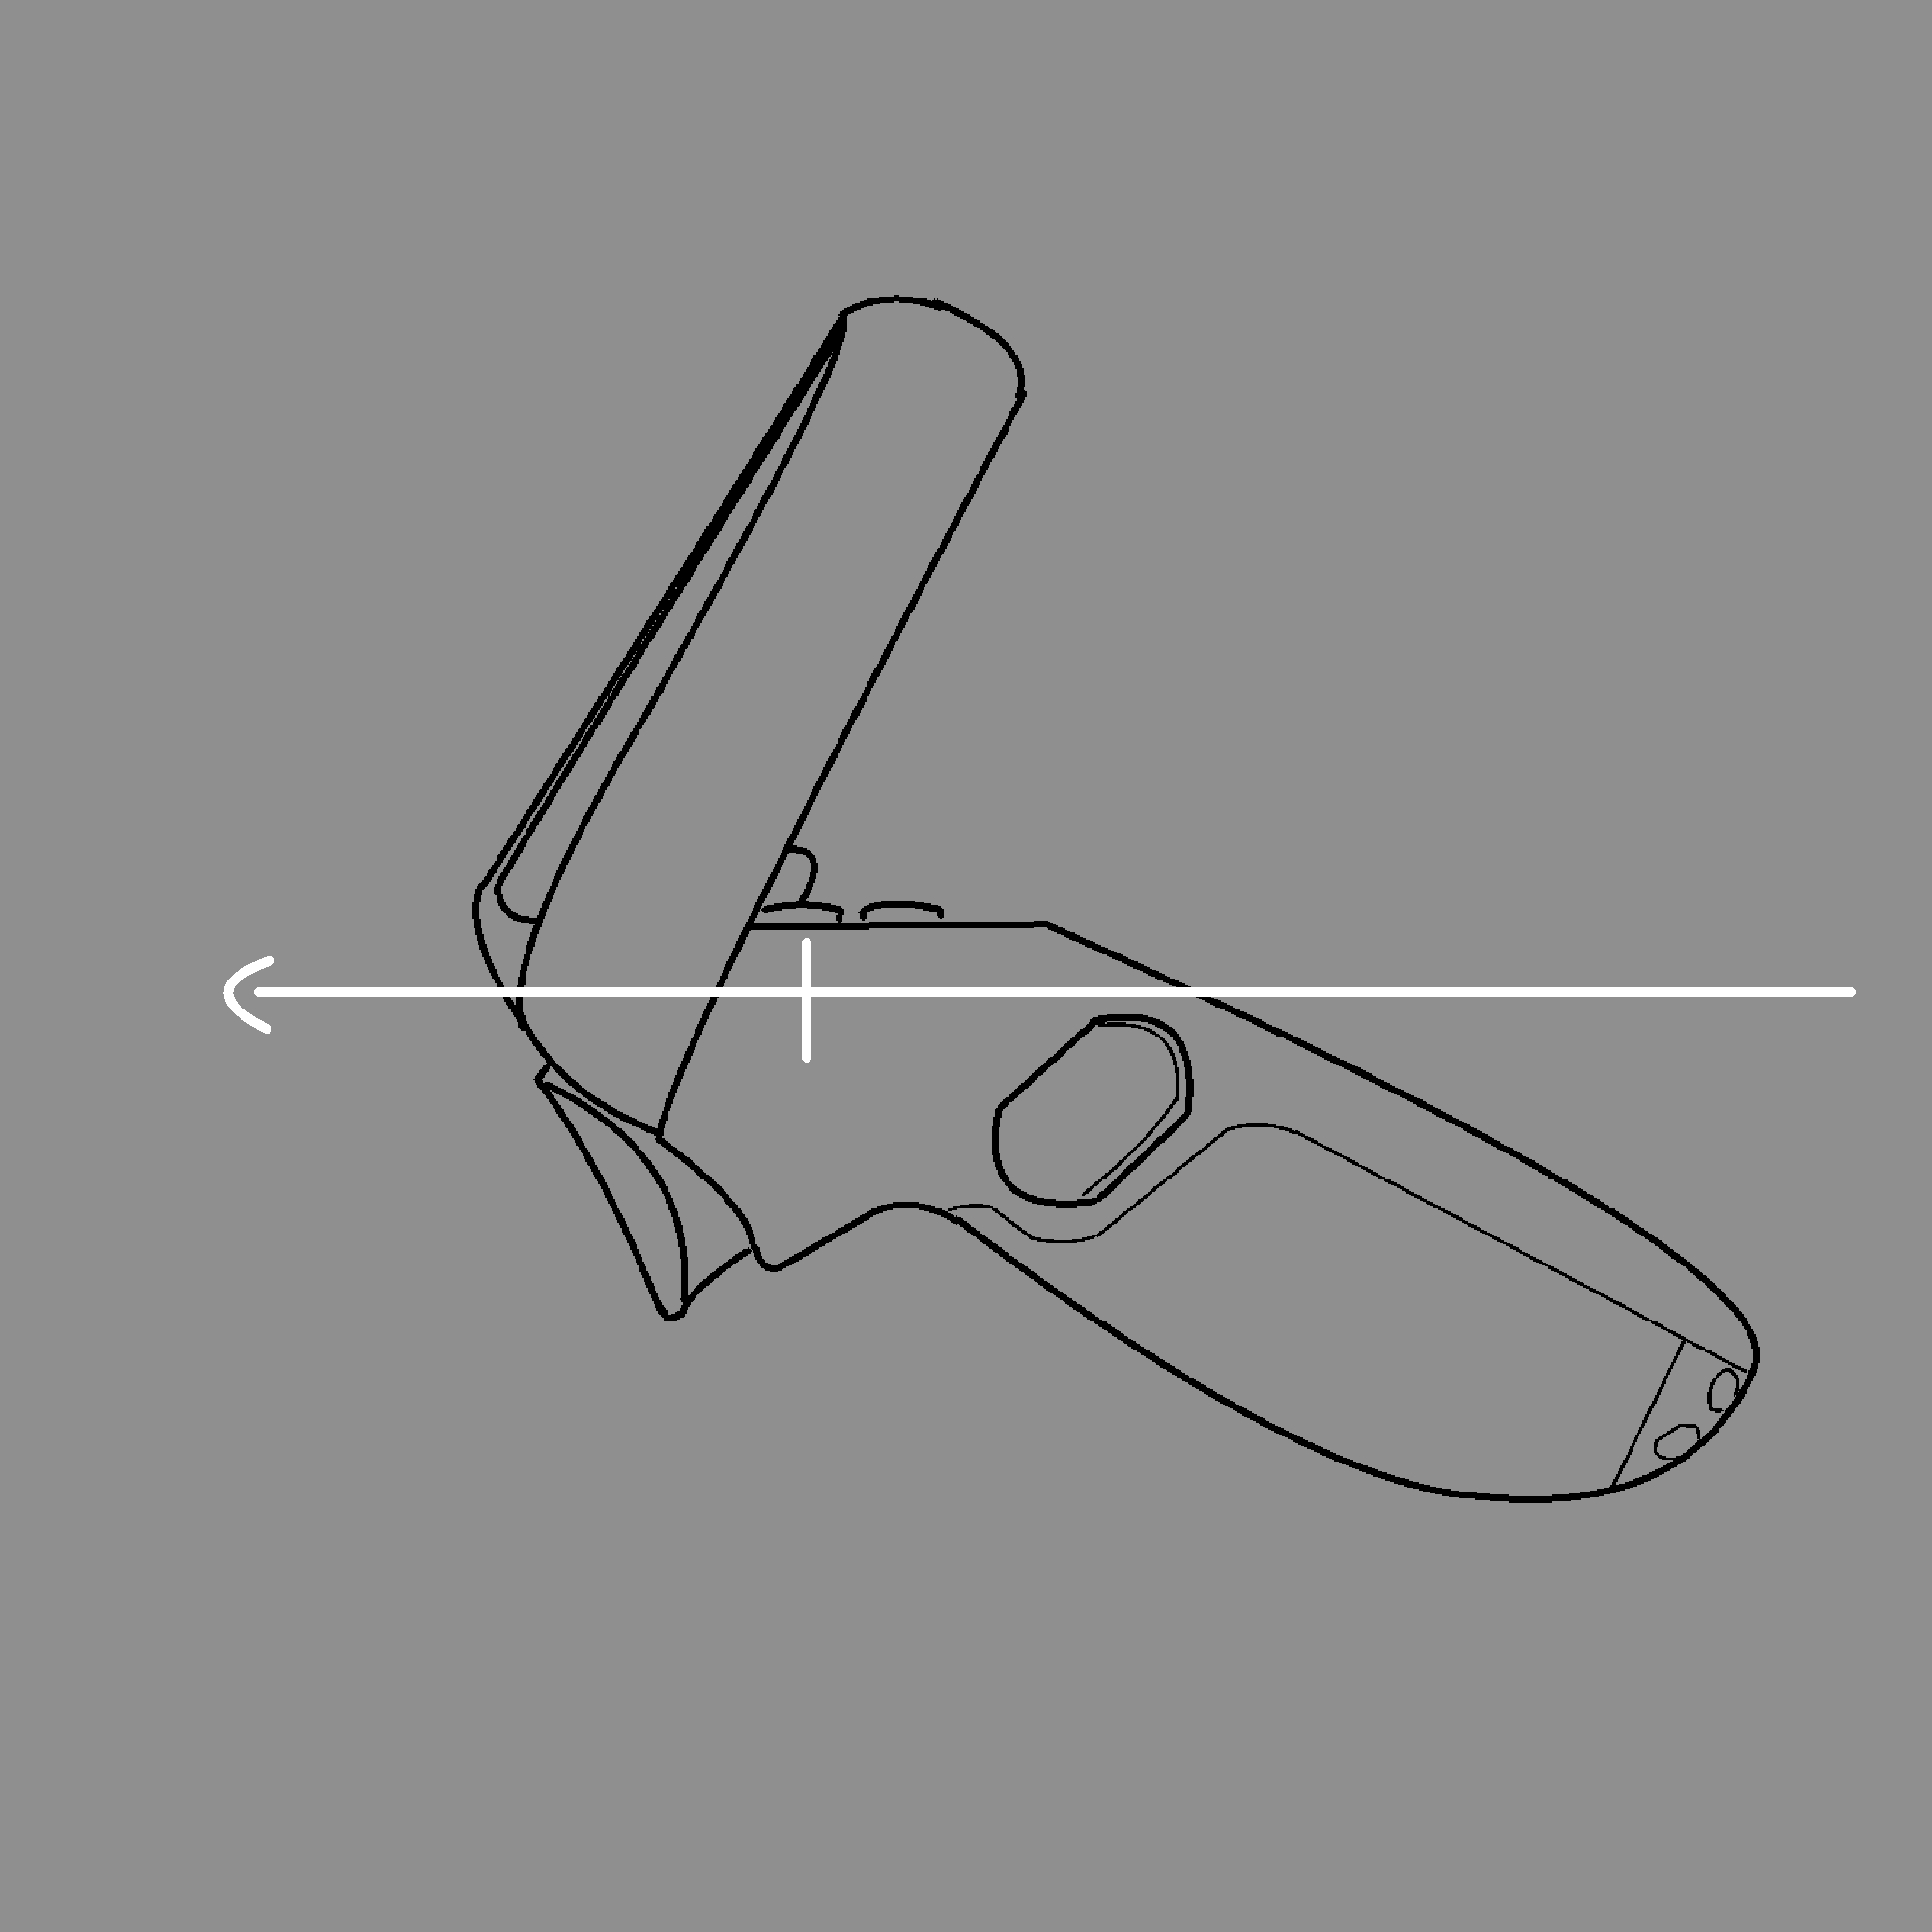
Grip Pose
On the other hand, Grip pose is useful when you want to place a model, such as a sword or a stick, in the player's hand.
The origin and facing direction of Grip pose is as shown in the following.
XR Interaction Toolkit-Basic Input
What will you learn?
You will learn how to setup a project that utilizes the XR Interaction Toolkit to create immersive content that runs on VIVE Devices .
Note: In this tutorial we will use Unity 2021.3.9f1 and VIVE Devices.
What is the XR Interaction Toolkit? The XR Interaction Toolkit package is a high-level, component-based, interaction system for creating VR and AR experiences. It provides a framework that makes 3D and UI interactions available from Unity input events.
Names of Inputs on Controllers
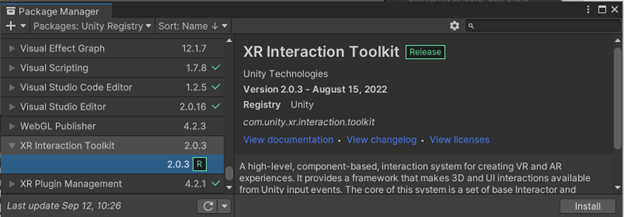
Setup Project
-
From menu: Window-> Package Manager. Install XR Interaction Toolkit. If you run into issues with the installation, you can reference Unity's documentation on installing the XR Interaction Toolkit. Link
-
Under the XR Interaction Toolkit , select the Samples dropdown and Import the Starter Assets.
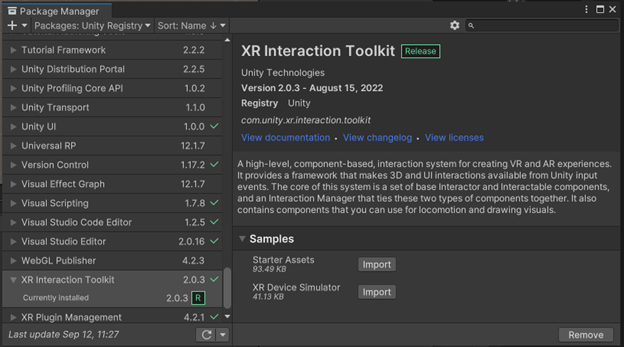
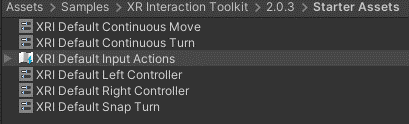
-
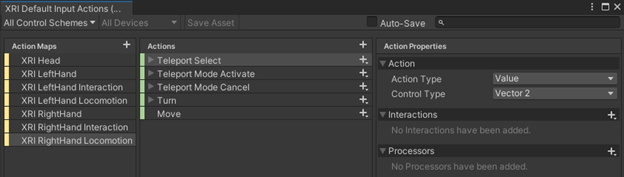
Locate the XRI Default Input Actions asset under the Starter Assets directory and open it. Here, you can edit Actions and map to different controller inputs.
Create a test scene
-
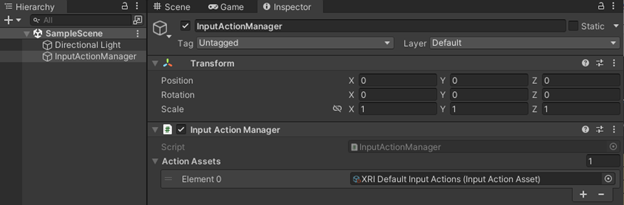
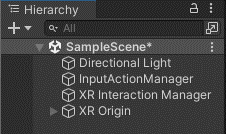
Right-click in the Hierarchy window and create a new gameobject. Rename gameobject to InputActionManager.
-
Add the InputActionManager script to the InputActionManager gameobject
-
Add the XRI Default Input Actions asset to the Action Assets list on the InputActionManager script.
-
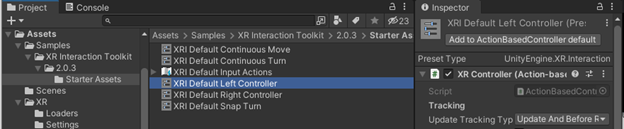
Find the XRI Default Left Controller in the Project window, click the Add to ActionBasedController default button in the Inspector.
-
Find the XRI Default Right Controller in the Project window, click the Add to ActionBasedController default button in the Inspector.

-
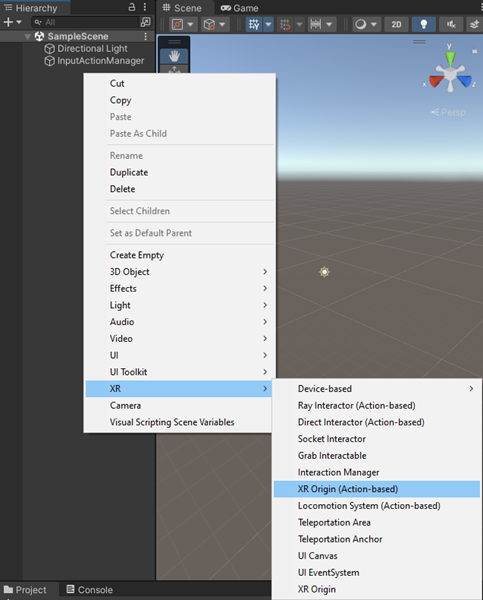
Right-Click in the Hierarchy window and select XR-> XR Origin.
-
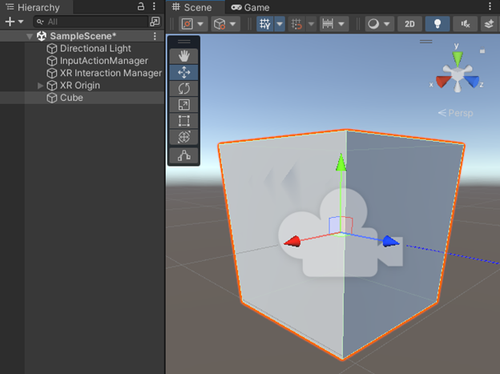
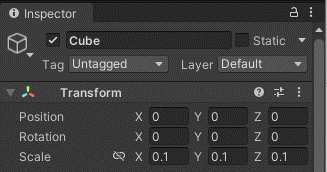
Right-click in the Hierarchy window and select 3D Object -> Cube. Update the Scale of the cube to 0.1 for X, Y and Z in the Inspector window.
-
Right-click in the Project window and select Create-> C# Script. Rename the script to ChangePosition.

-
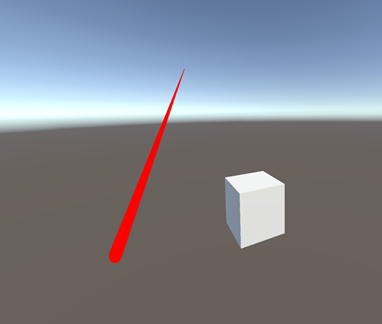
Update the ChangePosition script with the code snippet below and add the ChangePosition script to the Cube object. This script will change the position of an object based on the position of the right hand controller.
using UnityEngine; using UnityEngine.InputSystem; public class ChangePosition : MonoBehaviour { [SerializeField] private InputActionReference RightControllerPosition; void Update() { Vector3 controllerPosition = RightControllerPosition.action.ReadValue<Vector3>(); transform.position = controllerPosition; } } -
Update the Right Controller Position reference on the ChangePosition script to XRI RightHand/Position (Input Action Reference).

-
Confirm that the cube’s position is moving based on the right hand controller’s movement.
See Also
Open source project
- XR_HTC_vive_focus3_controller_interaction and XR_HTC_vive_cosmos_controller_interaction extensions.
- VIVE Devices