Spectator Camera (Beta)
The VIVE OpenXR plugin supports the Spectator Camera feature, which allows players to record and display their VR environment from the middle of the two eyes or bind the spectator camera to a tracker so they can freely control the camera/recording position according to their needs. This feature is very helpful for recording or streaming to an external monitor.
This feature is only available in Unity LTS version 2022.3.0f1 or above.
Supported Platforms and Devices
| Platform | Headset | Supported | Plugin Version | |
| PC | PC Streaming | Focus 3/XR Elite/Focus Vision | X | |
| Pure PC | Vive Cosmos | X | ||
| Vive Pro series | X | |||
| AIO | Focus 3 | X | ||
| XR Elite | V | 2.5.0 and above | ||
| Focus Vision | V | 2.5.0 and above | ||
Specification
This chapter dives into creating immersive experiences with the Spectator Camera feature. We'll explore its use within the XR_MSFT_first_person_observer and XR_MSFT_secondary_view_configuration extensions.
Environment Settings
How to enable Spectator Camera
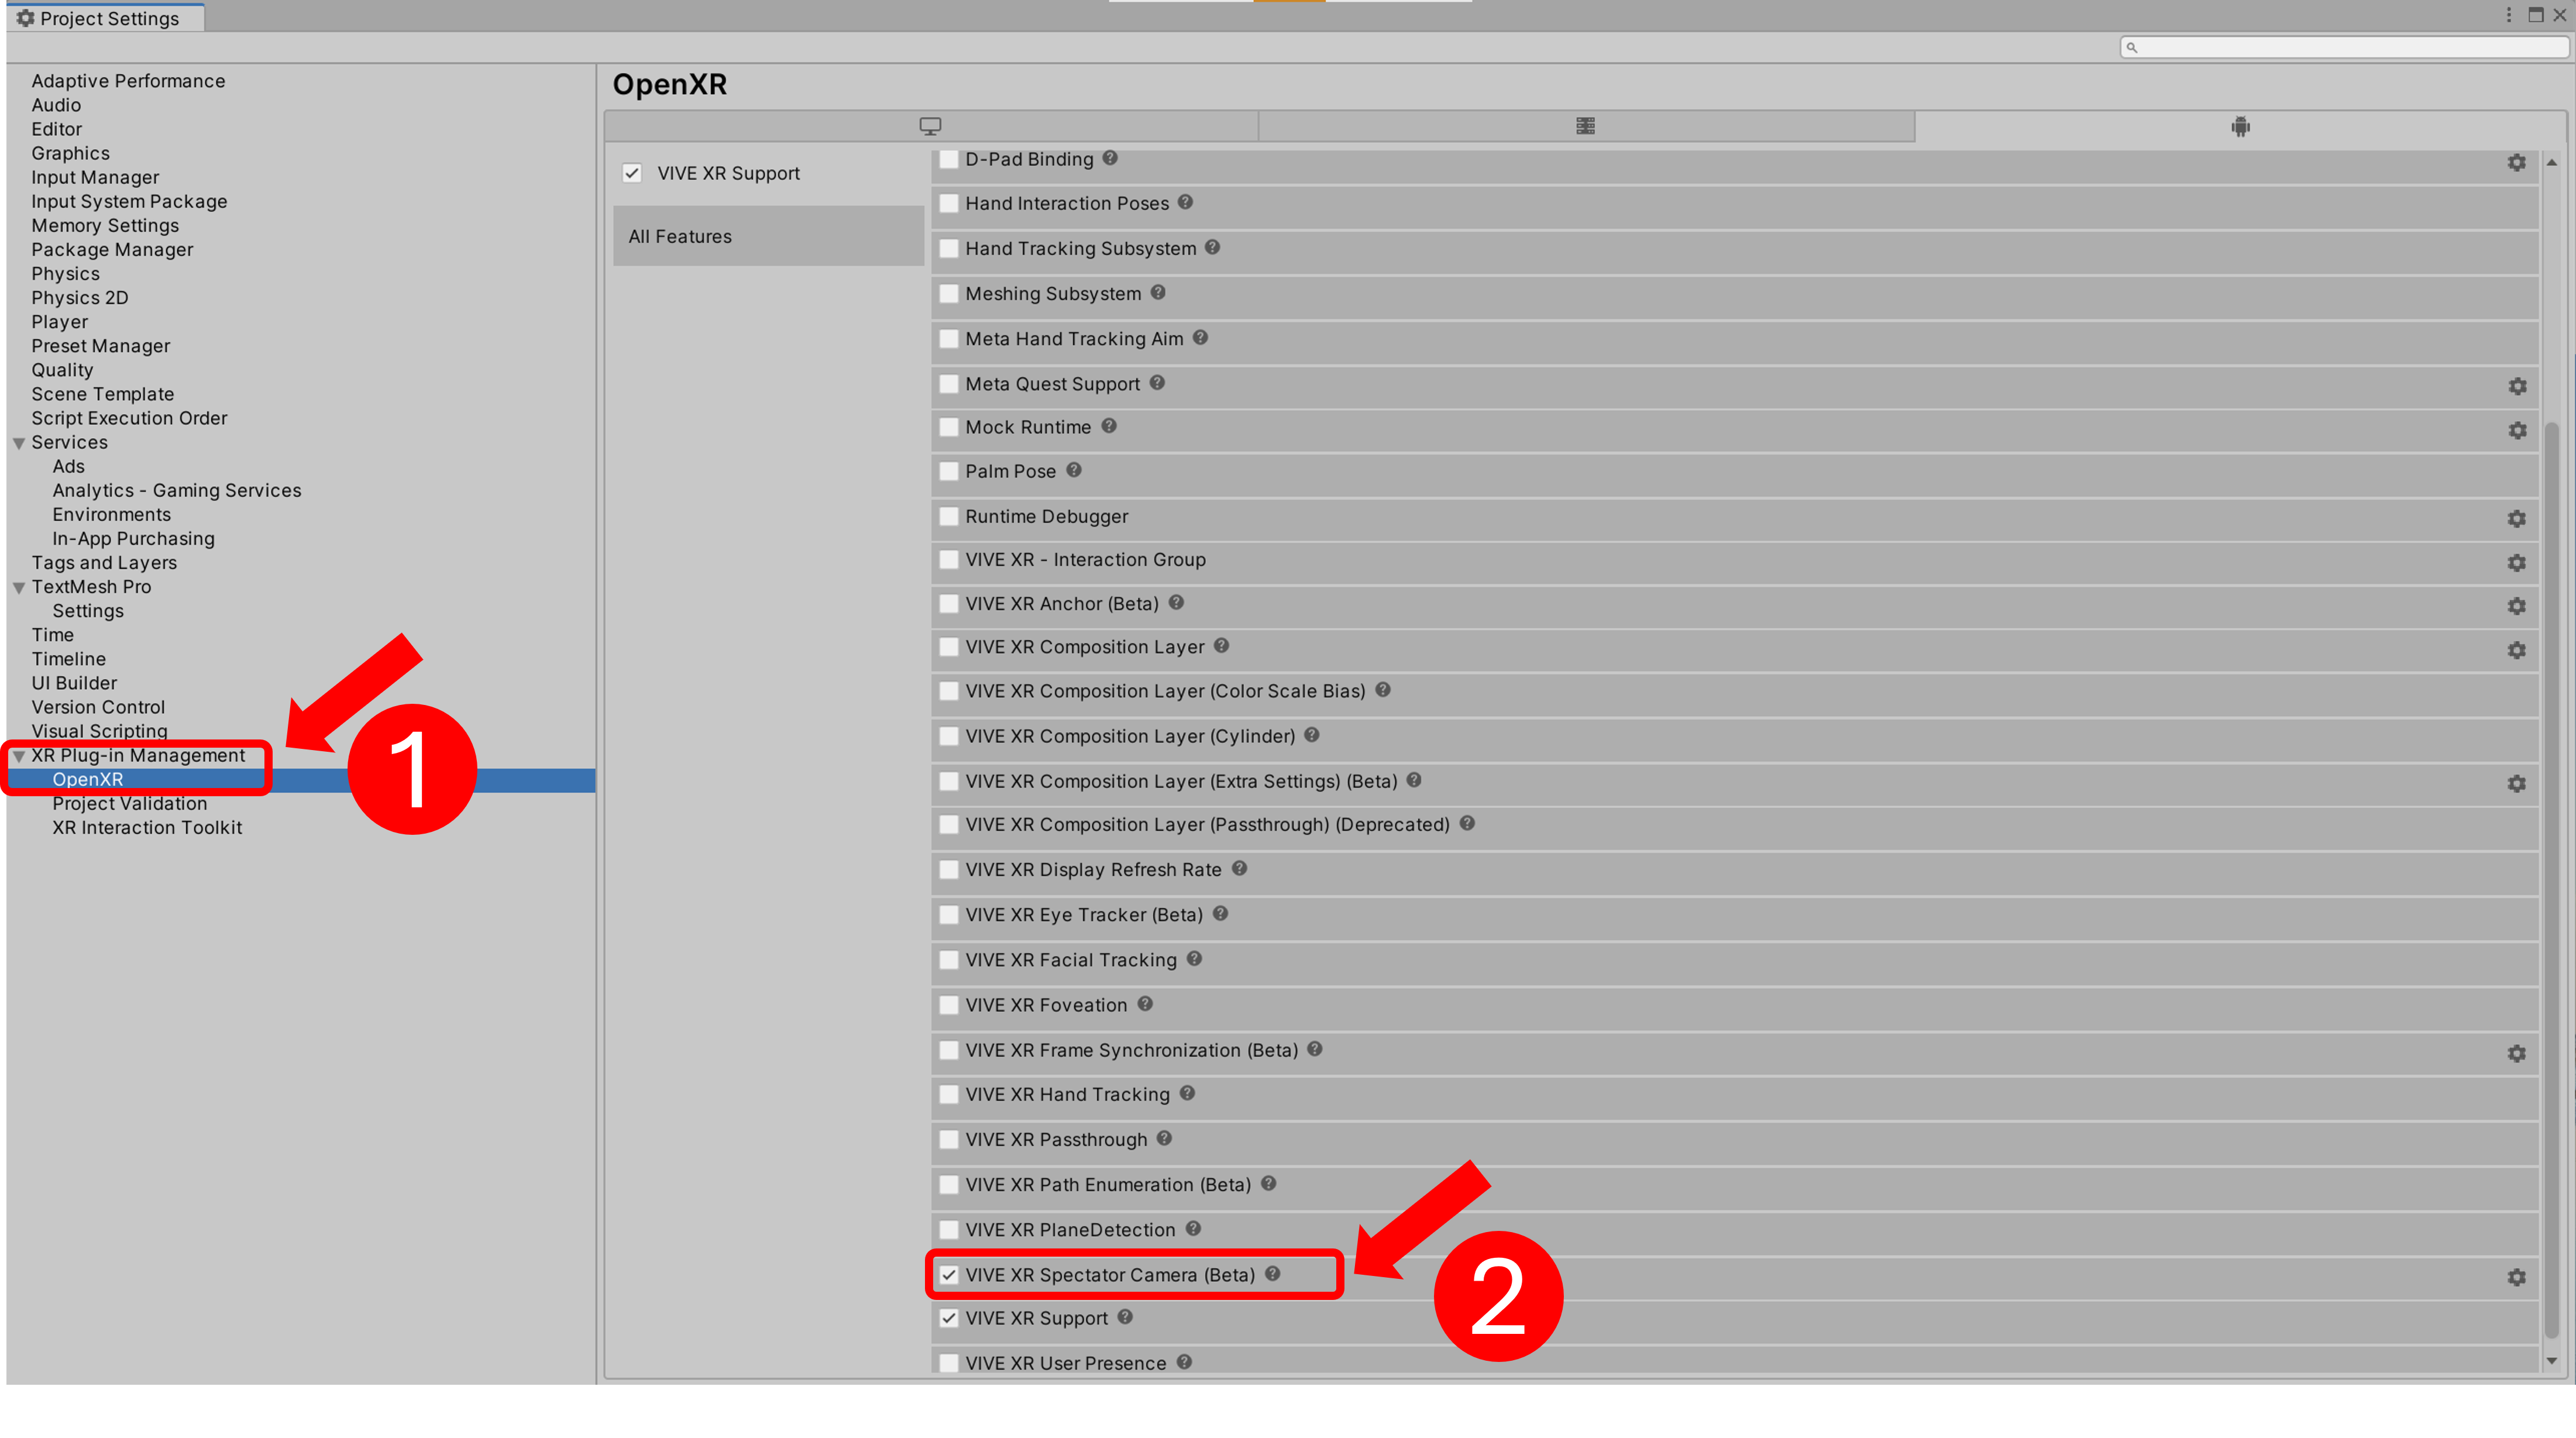
- In Edit > Project Settings > XR Plug-in Management > OpenXR, enable the "VIVE XR Spectator Camera (Beta)". (Make sure below "VIVE XR Support" is also enabled)
- Once two features are enabled, your recording or casting in the app will come from the middle of the two eyes.
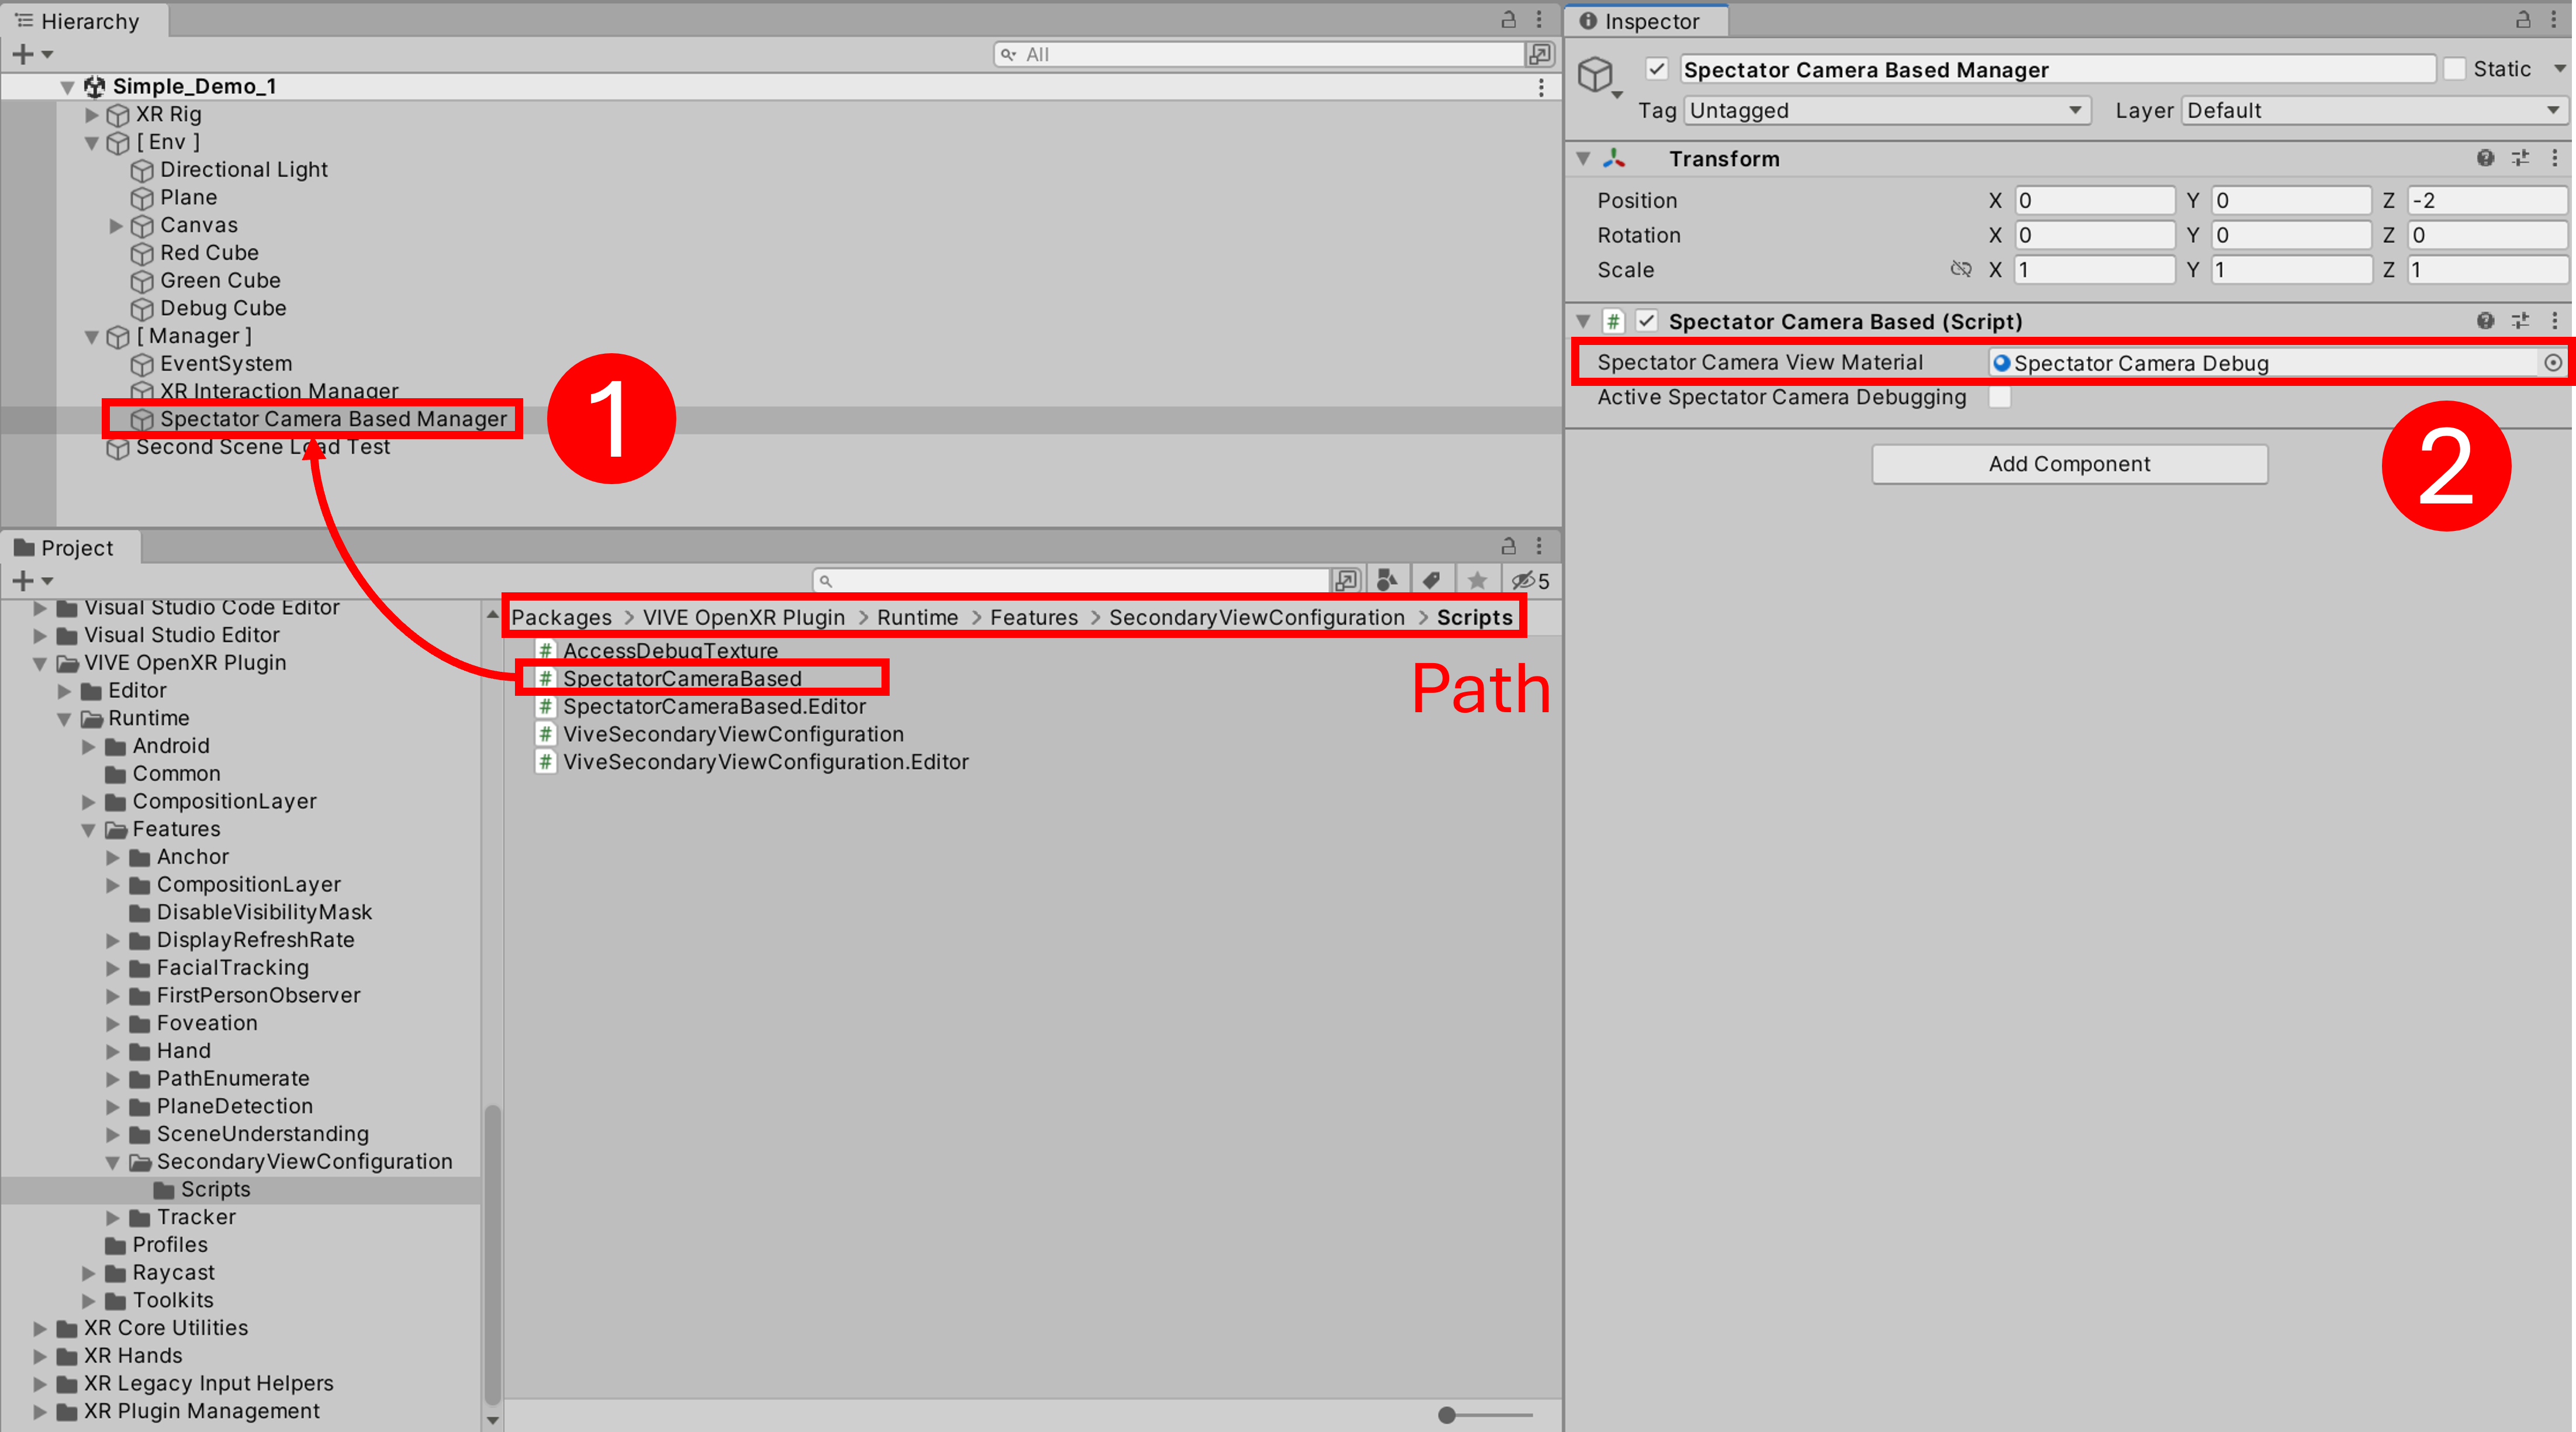
- (Optional) If you want to see/monitor the frame coming from Spectator Camera, please drag the script "SpectatorCameraBased.cs" (Path: Packages/VIVE OpenXR Plugin/Runtime/Features/SecondaryViewConfiguration/Scripts) to a GameObject in the game scene and then assign a material to the field "Spectator Camera View Material". The material you set will be written by the Spectator Camera once you record or cast in the app.
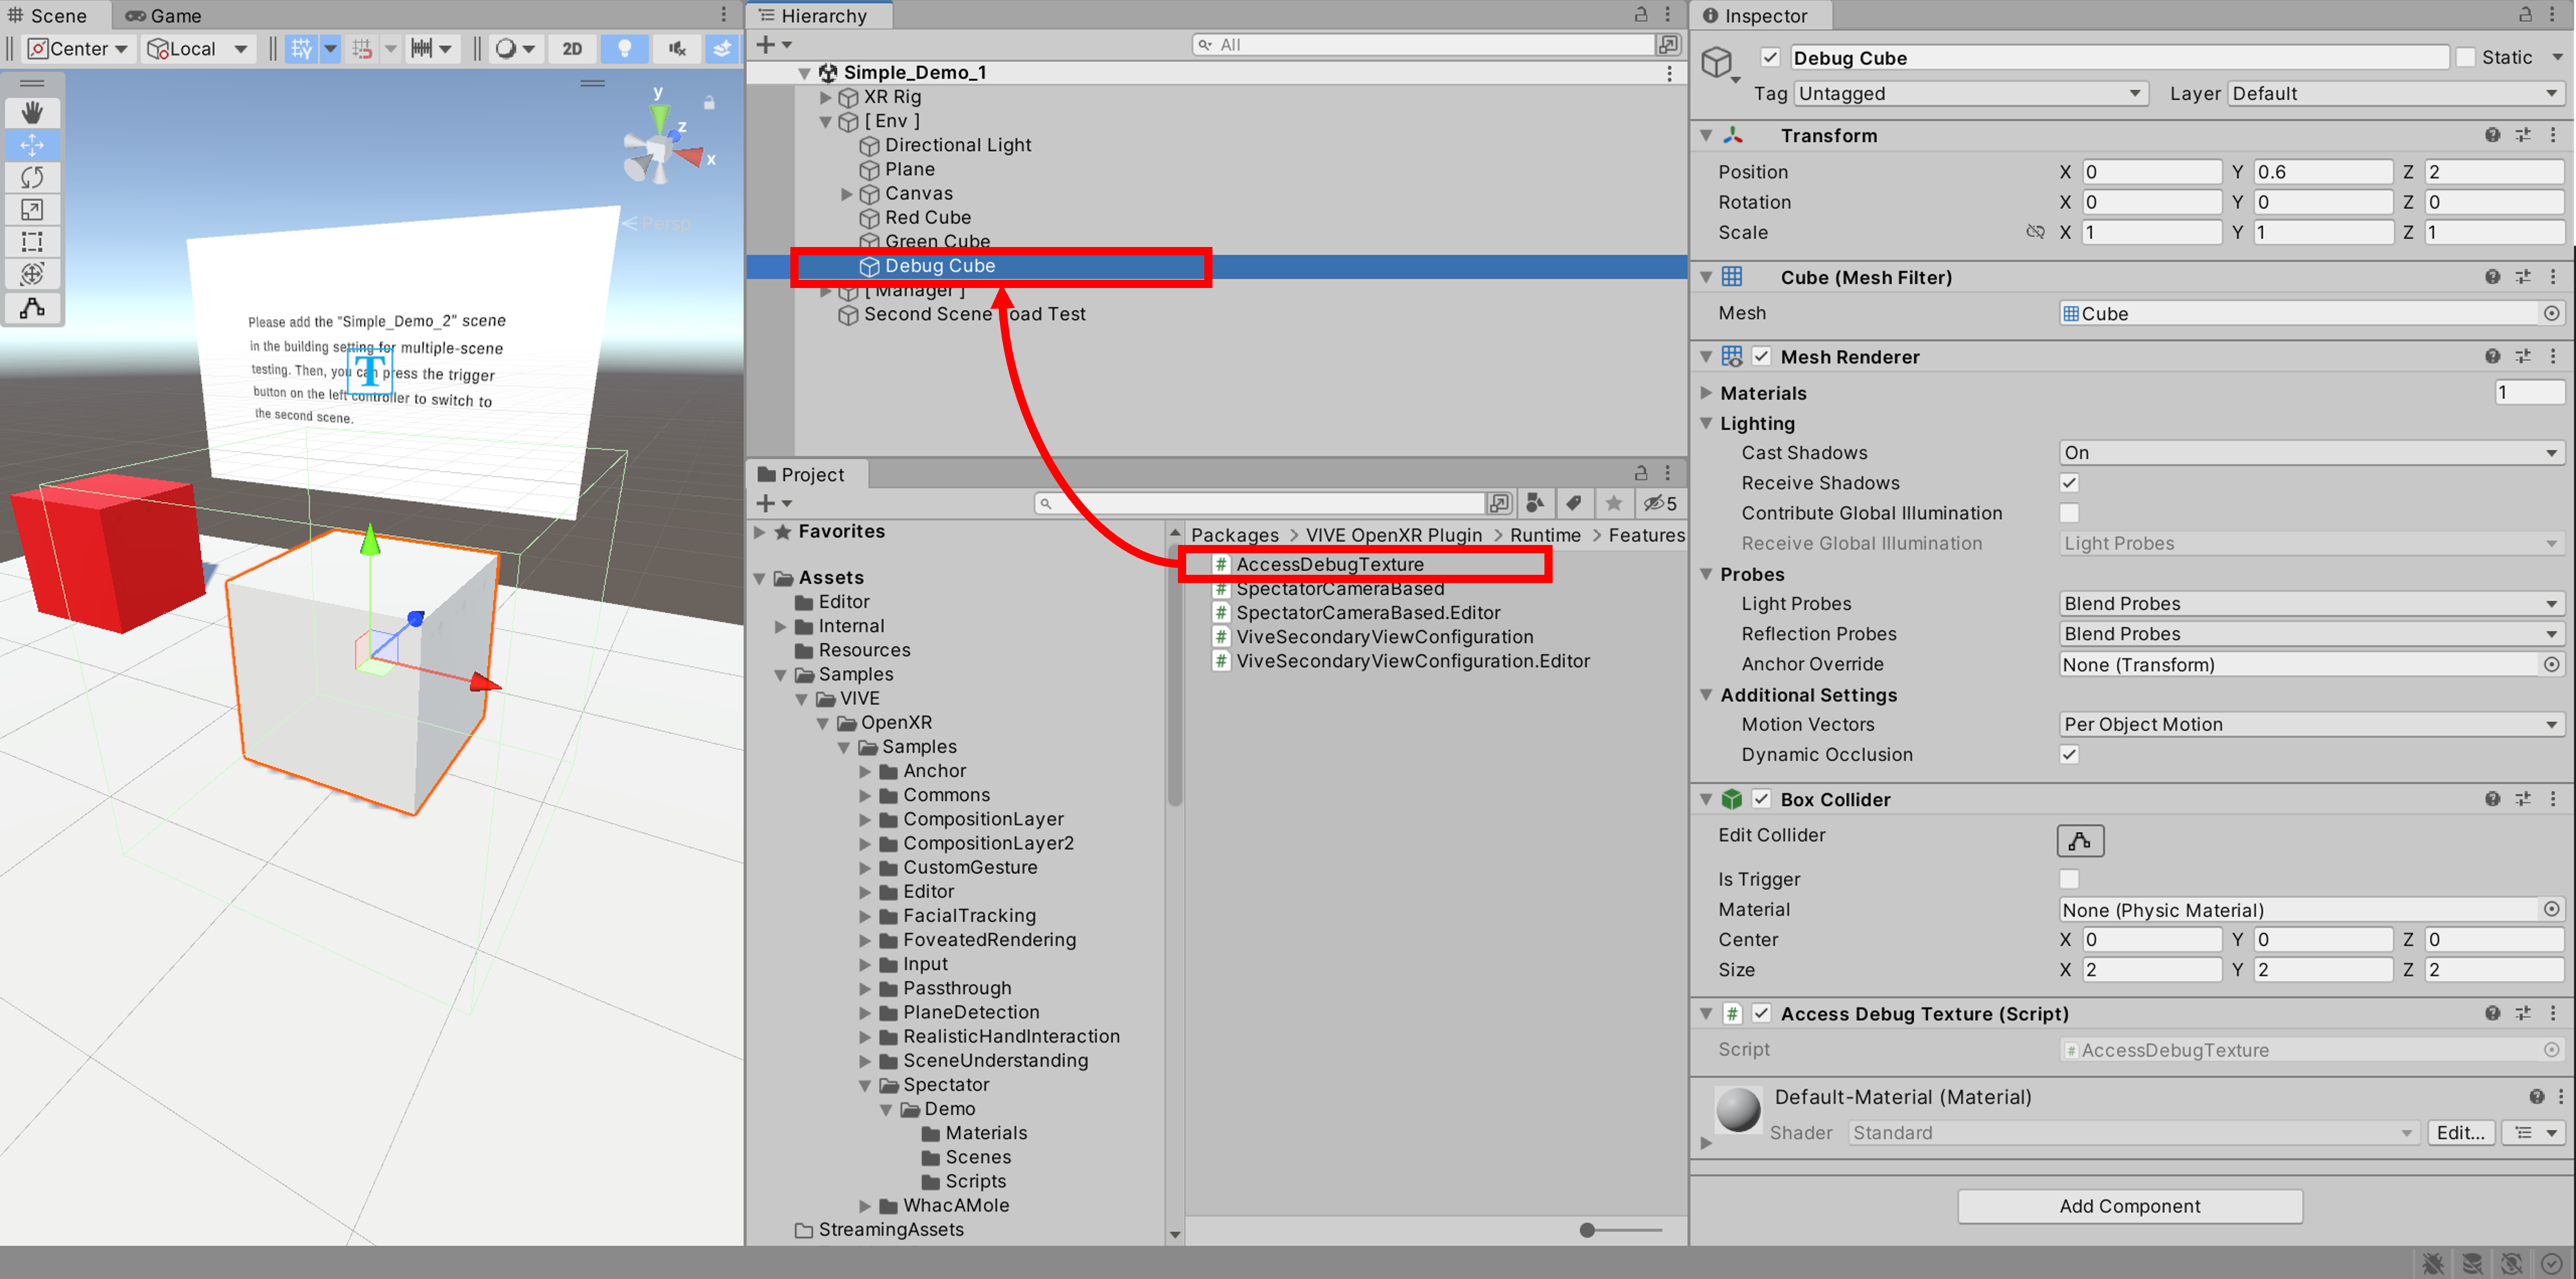
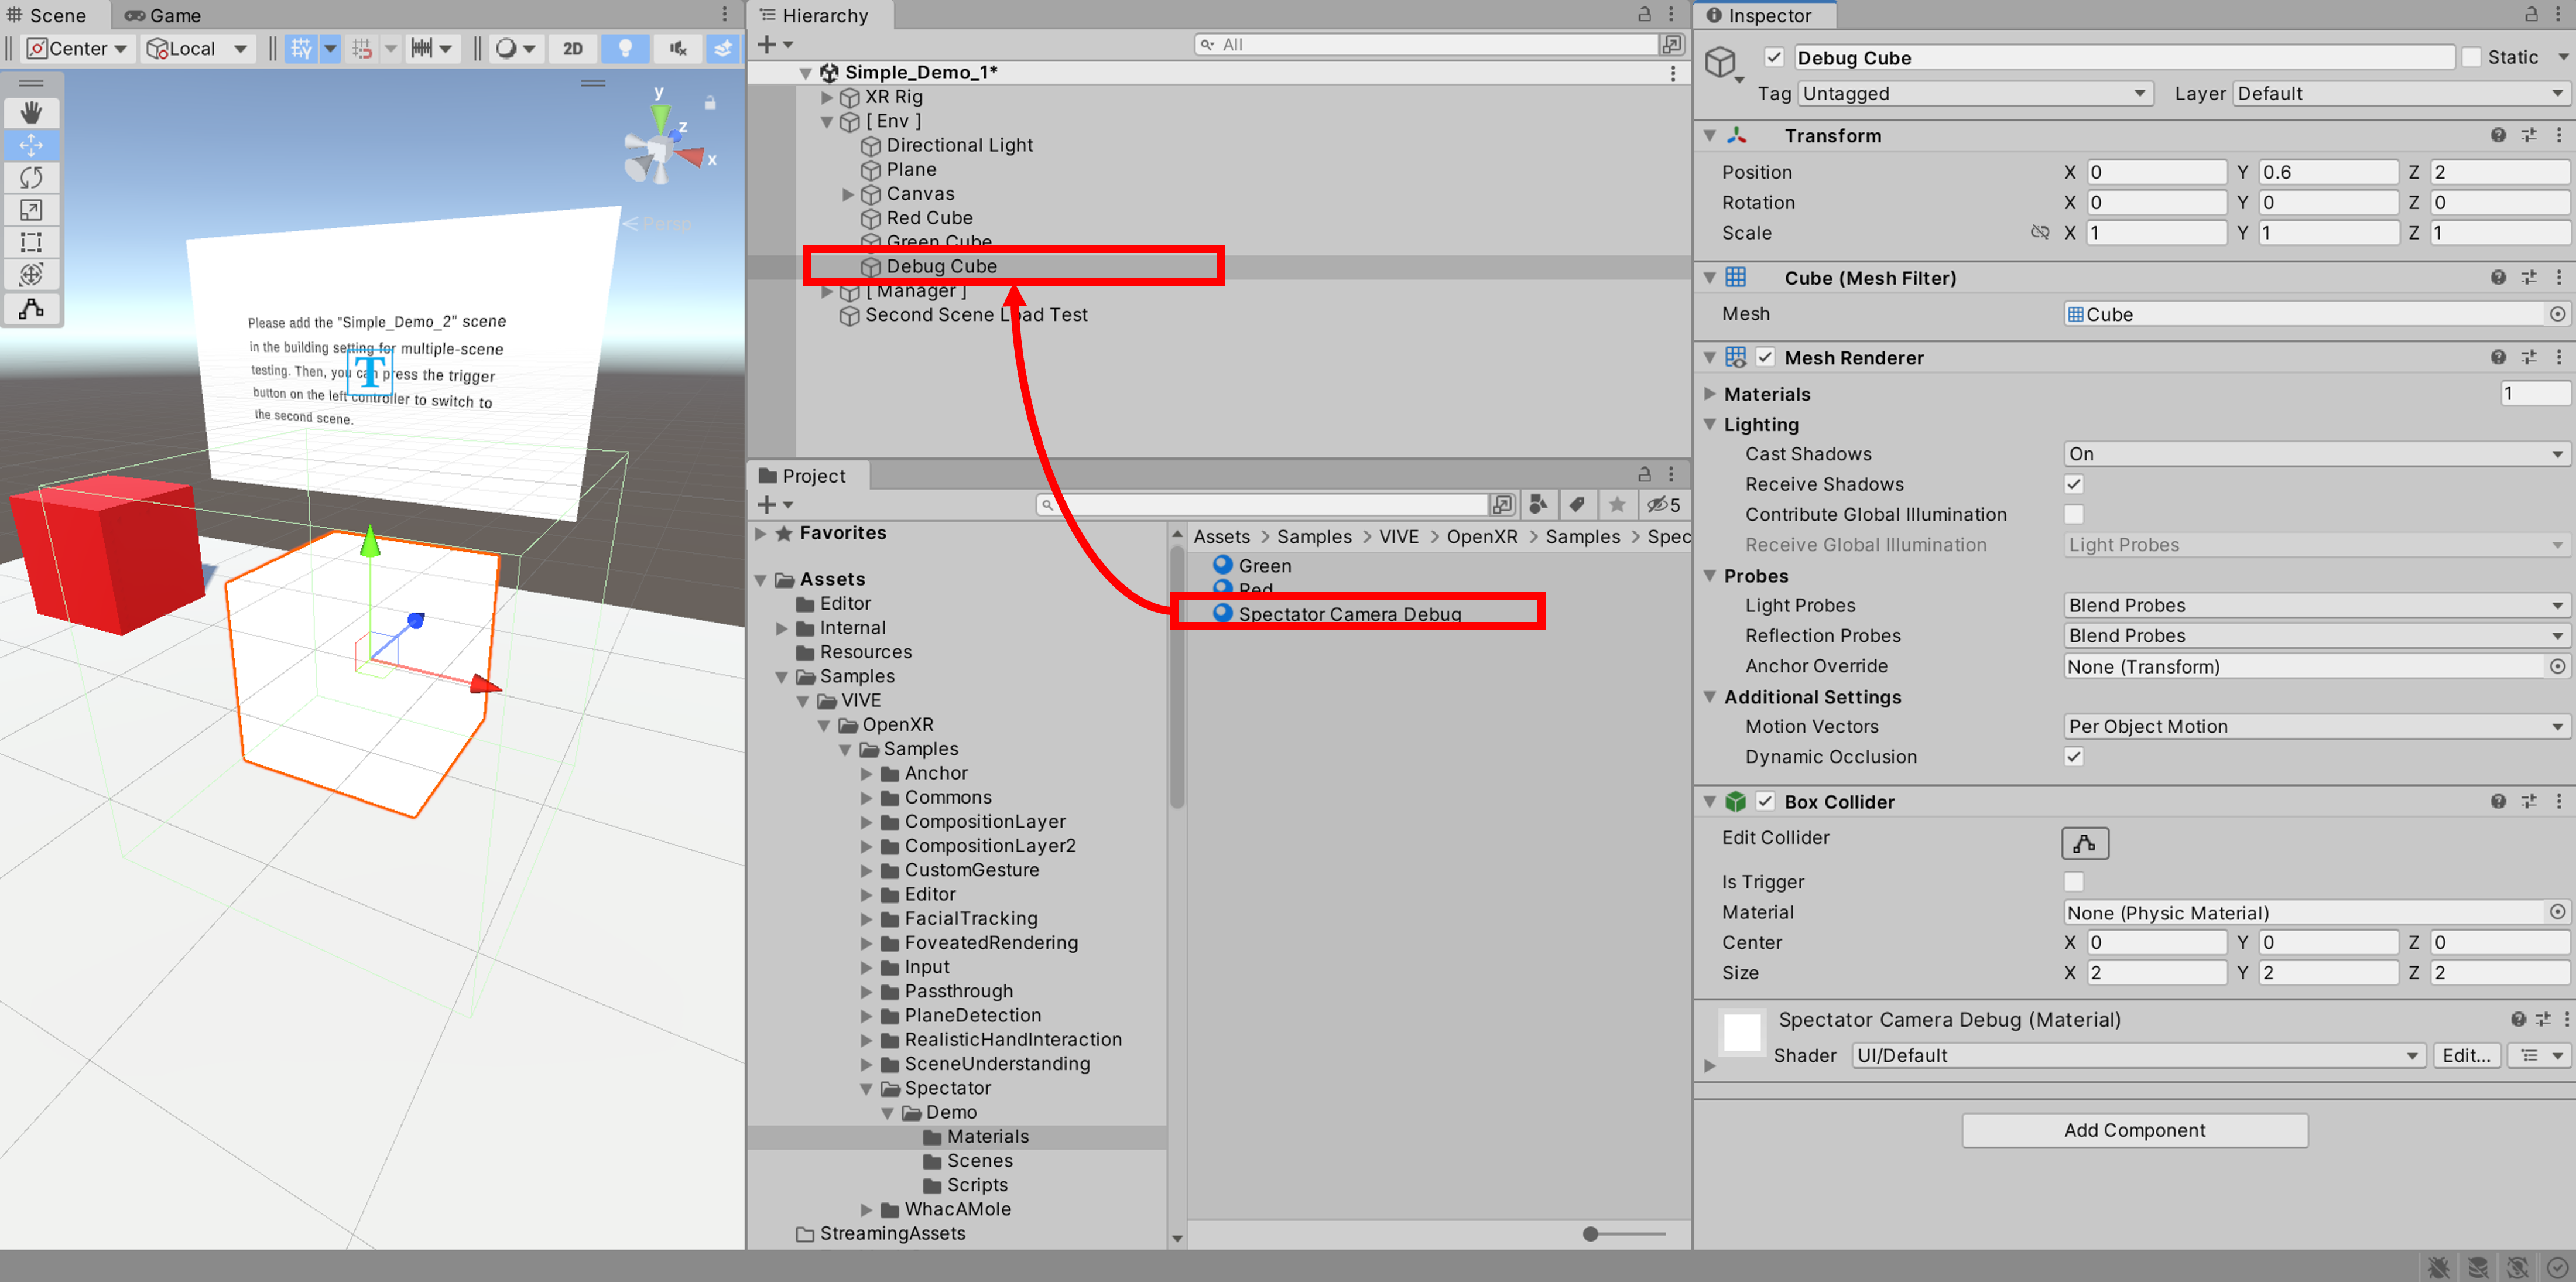
- (Optional) Drag the material you set in step 3 or the script "AccessDebugTexture.cs" (Path: Packages/VIVE OpenXR Plugin/Runtime/Features/SecondaryViewConfiguration/Scripts) to the GameObject, which has the "UnityEngine.Renderer" component for displaying.
Golden Sample
Advance usage of Spectator Camera (SpectatorCameraManager)
In some scenarios, the spectator camera is designed to follow another target (GameObject), for example, Hand Controller or Ultimate Tracker etc. The "SpectatorCameraManager" can help you achieve this purpose easily, just drag and drop GameObject in the Unity Editor. The following setup refers to our sample scene "Adv_Demo_1". (Path: Assets\Samples\VIVE\OpenXR\Samples\Spectator\AdvDemo\Scenes)
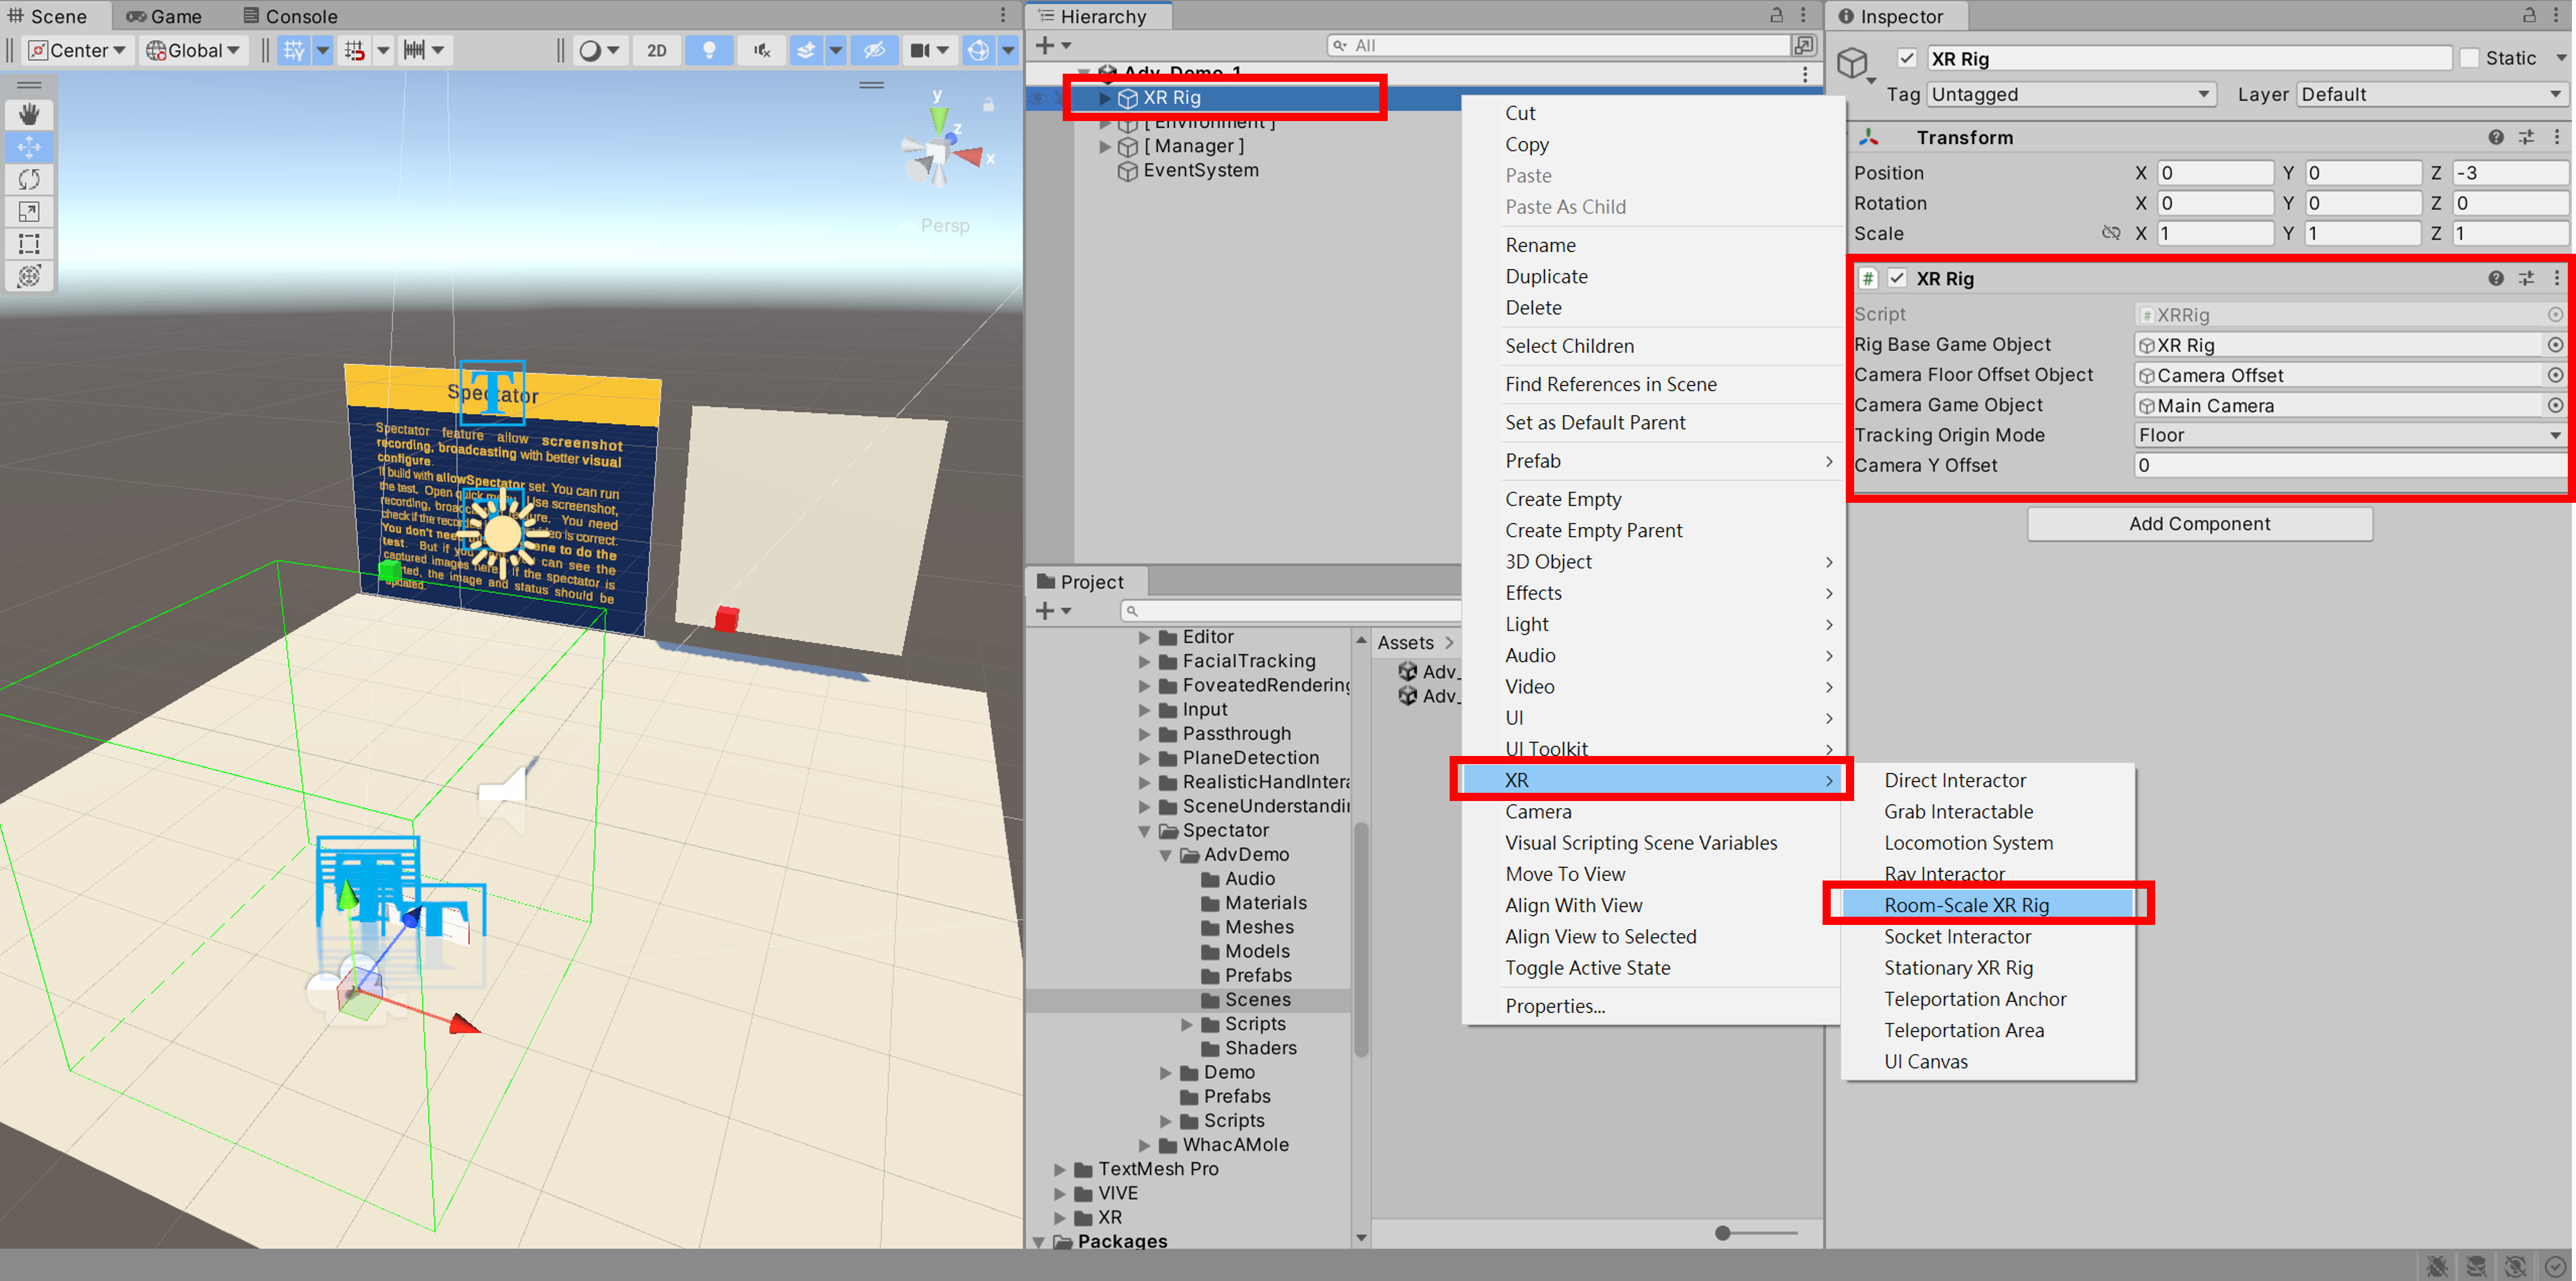
Step 1 . VR Environment Setup
Setup your virtual world in your project scene. (Usually, install XR Interaction Toolkit via package manager and then add "XR Rig" GameObject (or named "XR Original" in the new version) to the scene.)
Step 2 . Add Spectator Camera Tracker
Add a component named "Spectator Camera Tracker" into the Gamebject that you want to track by the spectator camera. In our sample, we add the component to the "Right Controller".
Step 3 . Add Spectator Camera Manager
Drag and drop the prefabs named "SpectatorCameraManager" into the scene. (Prefab is located in folder Assets\Samples\VIVE\OpenXR\Samples\Spectator\AdvDemo\Prefabs) Ensure the "Camera Source" value is set as "Tracker".
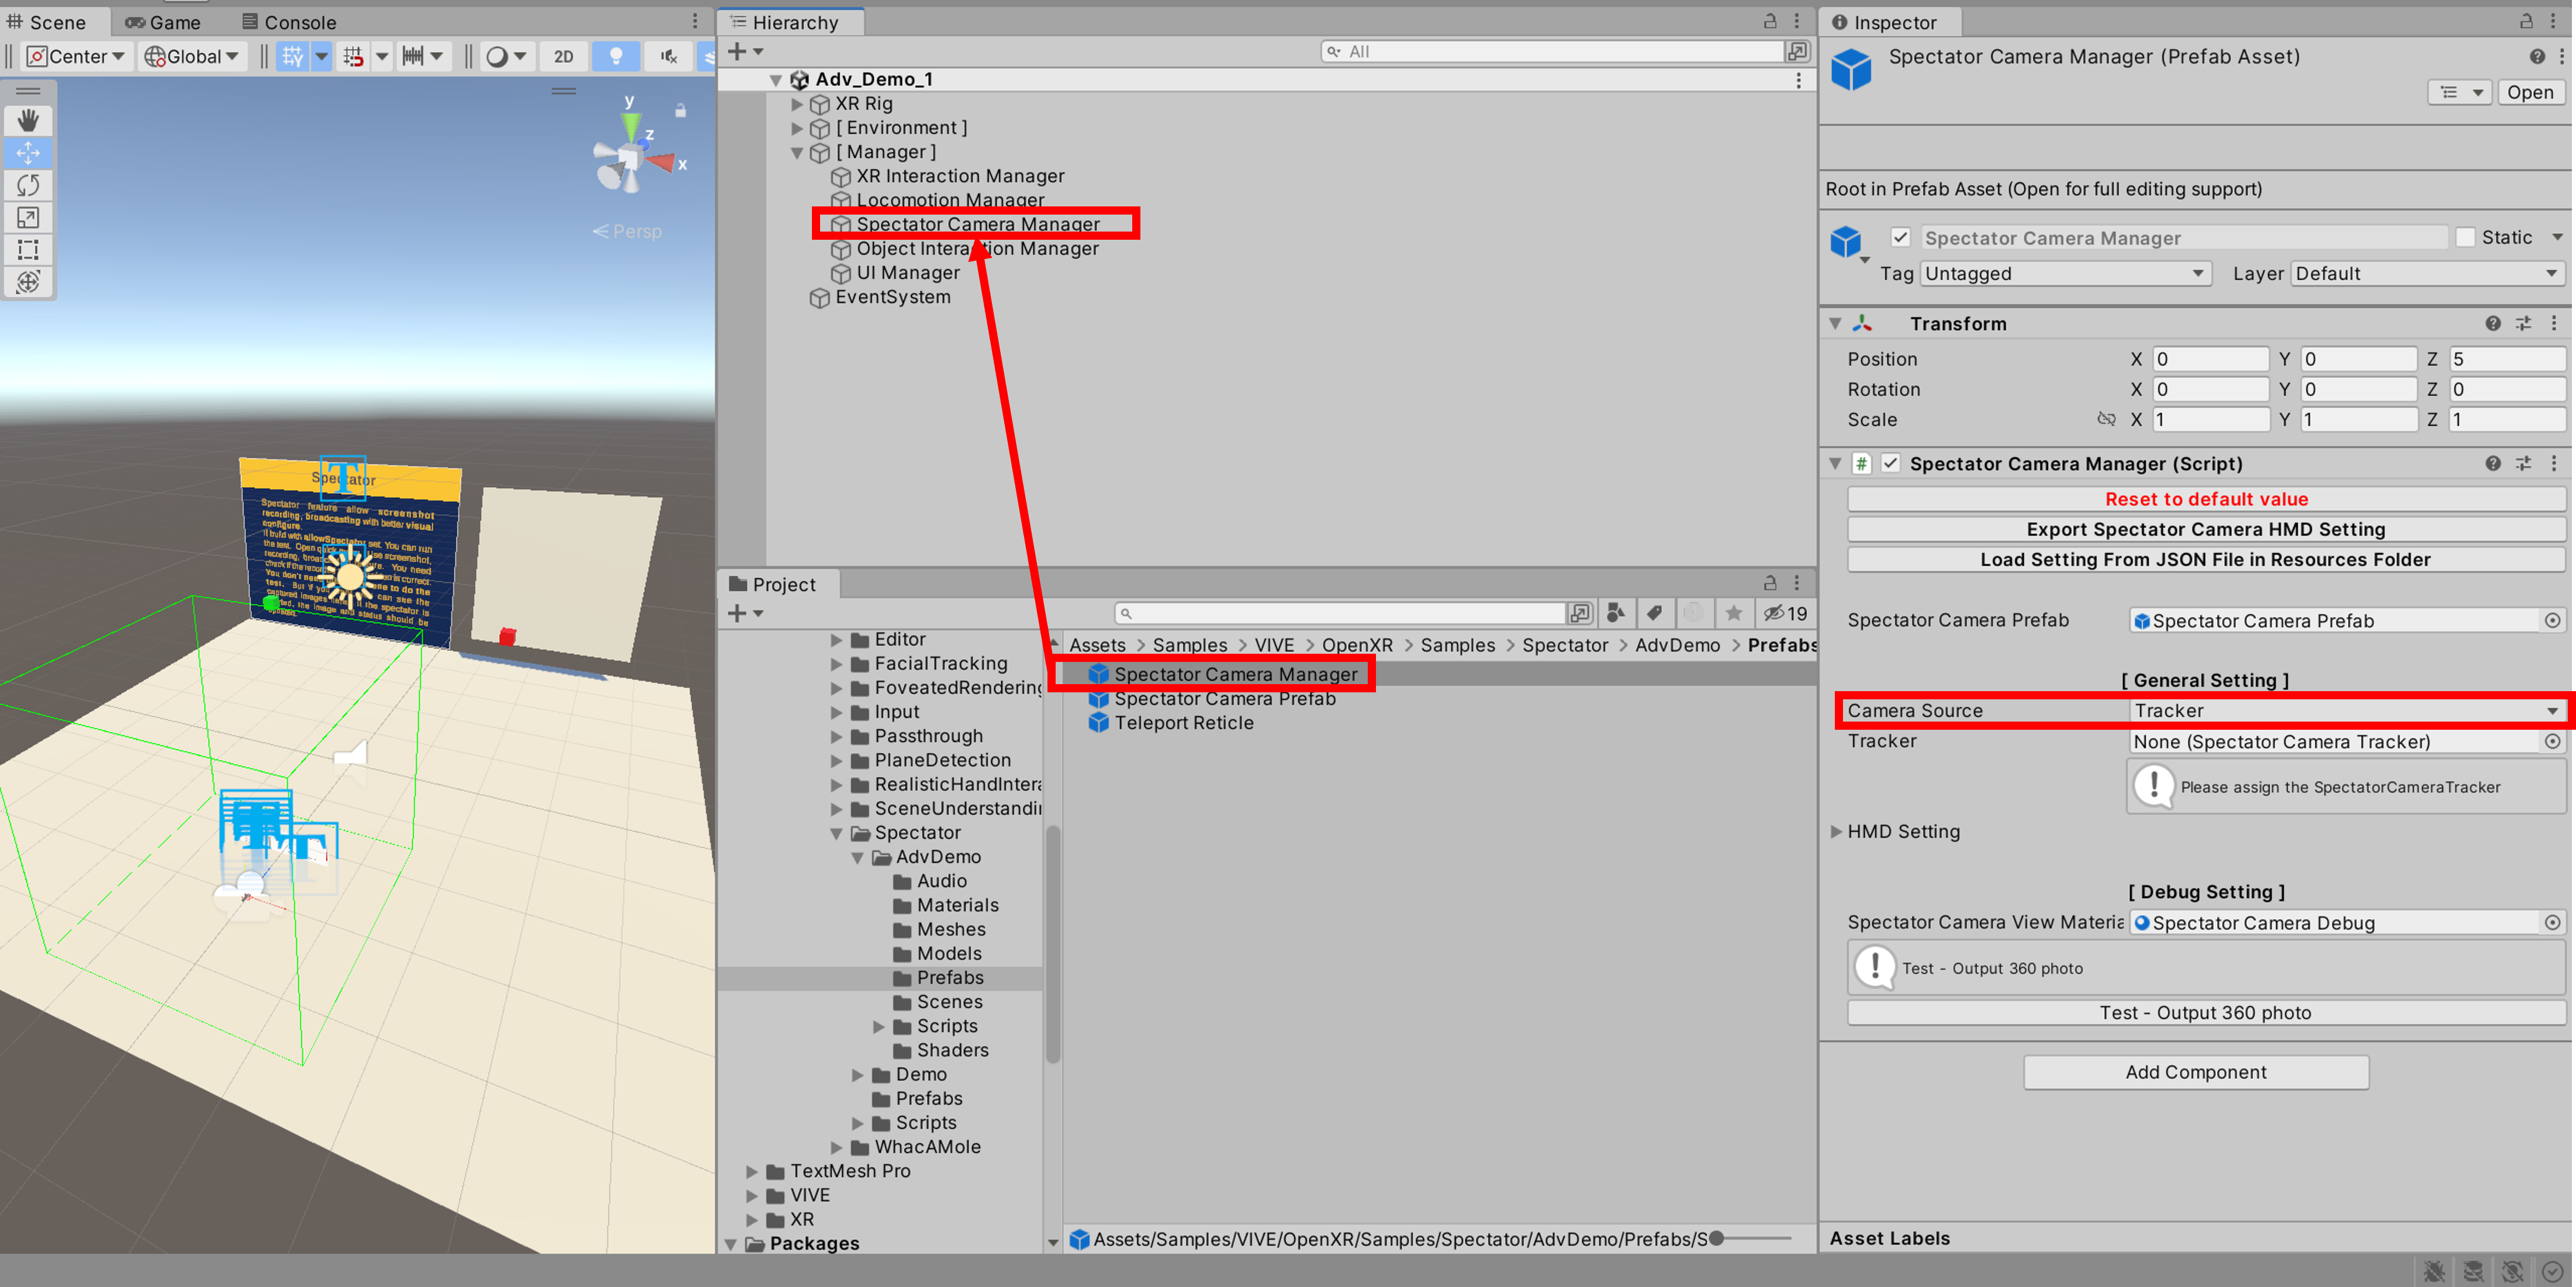
Step 4 . Binding the tracker in the Manager
Drag and drop the "GameObject in Step 2" to the "Tracker" field in the "SpectatorCameraManager".
Step 5 . Fine-tuning Spectator Camera Setting
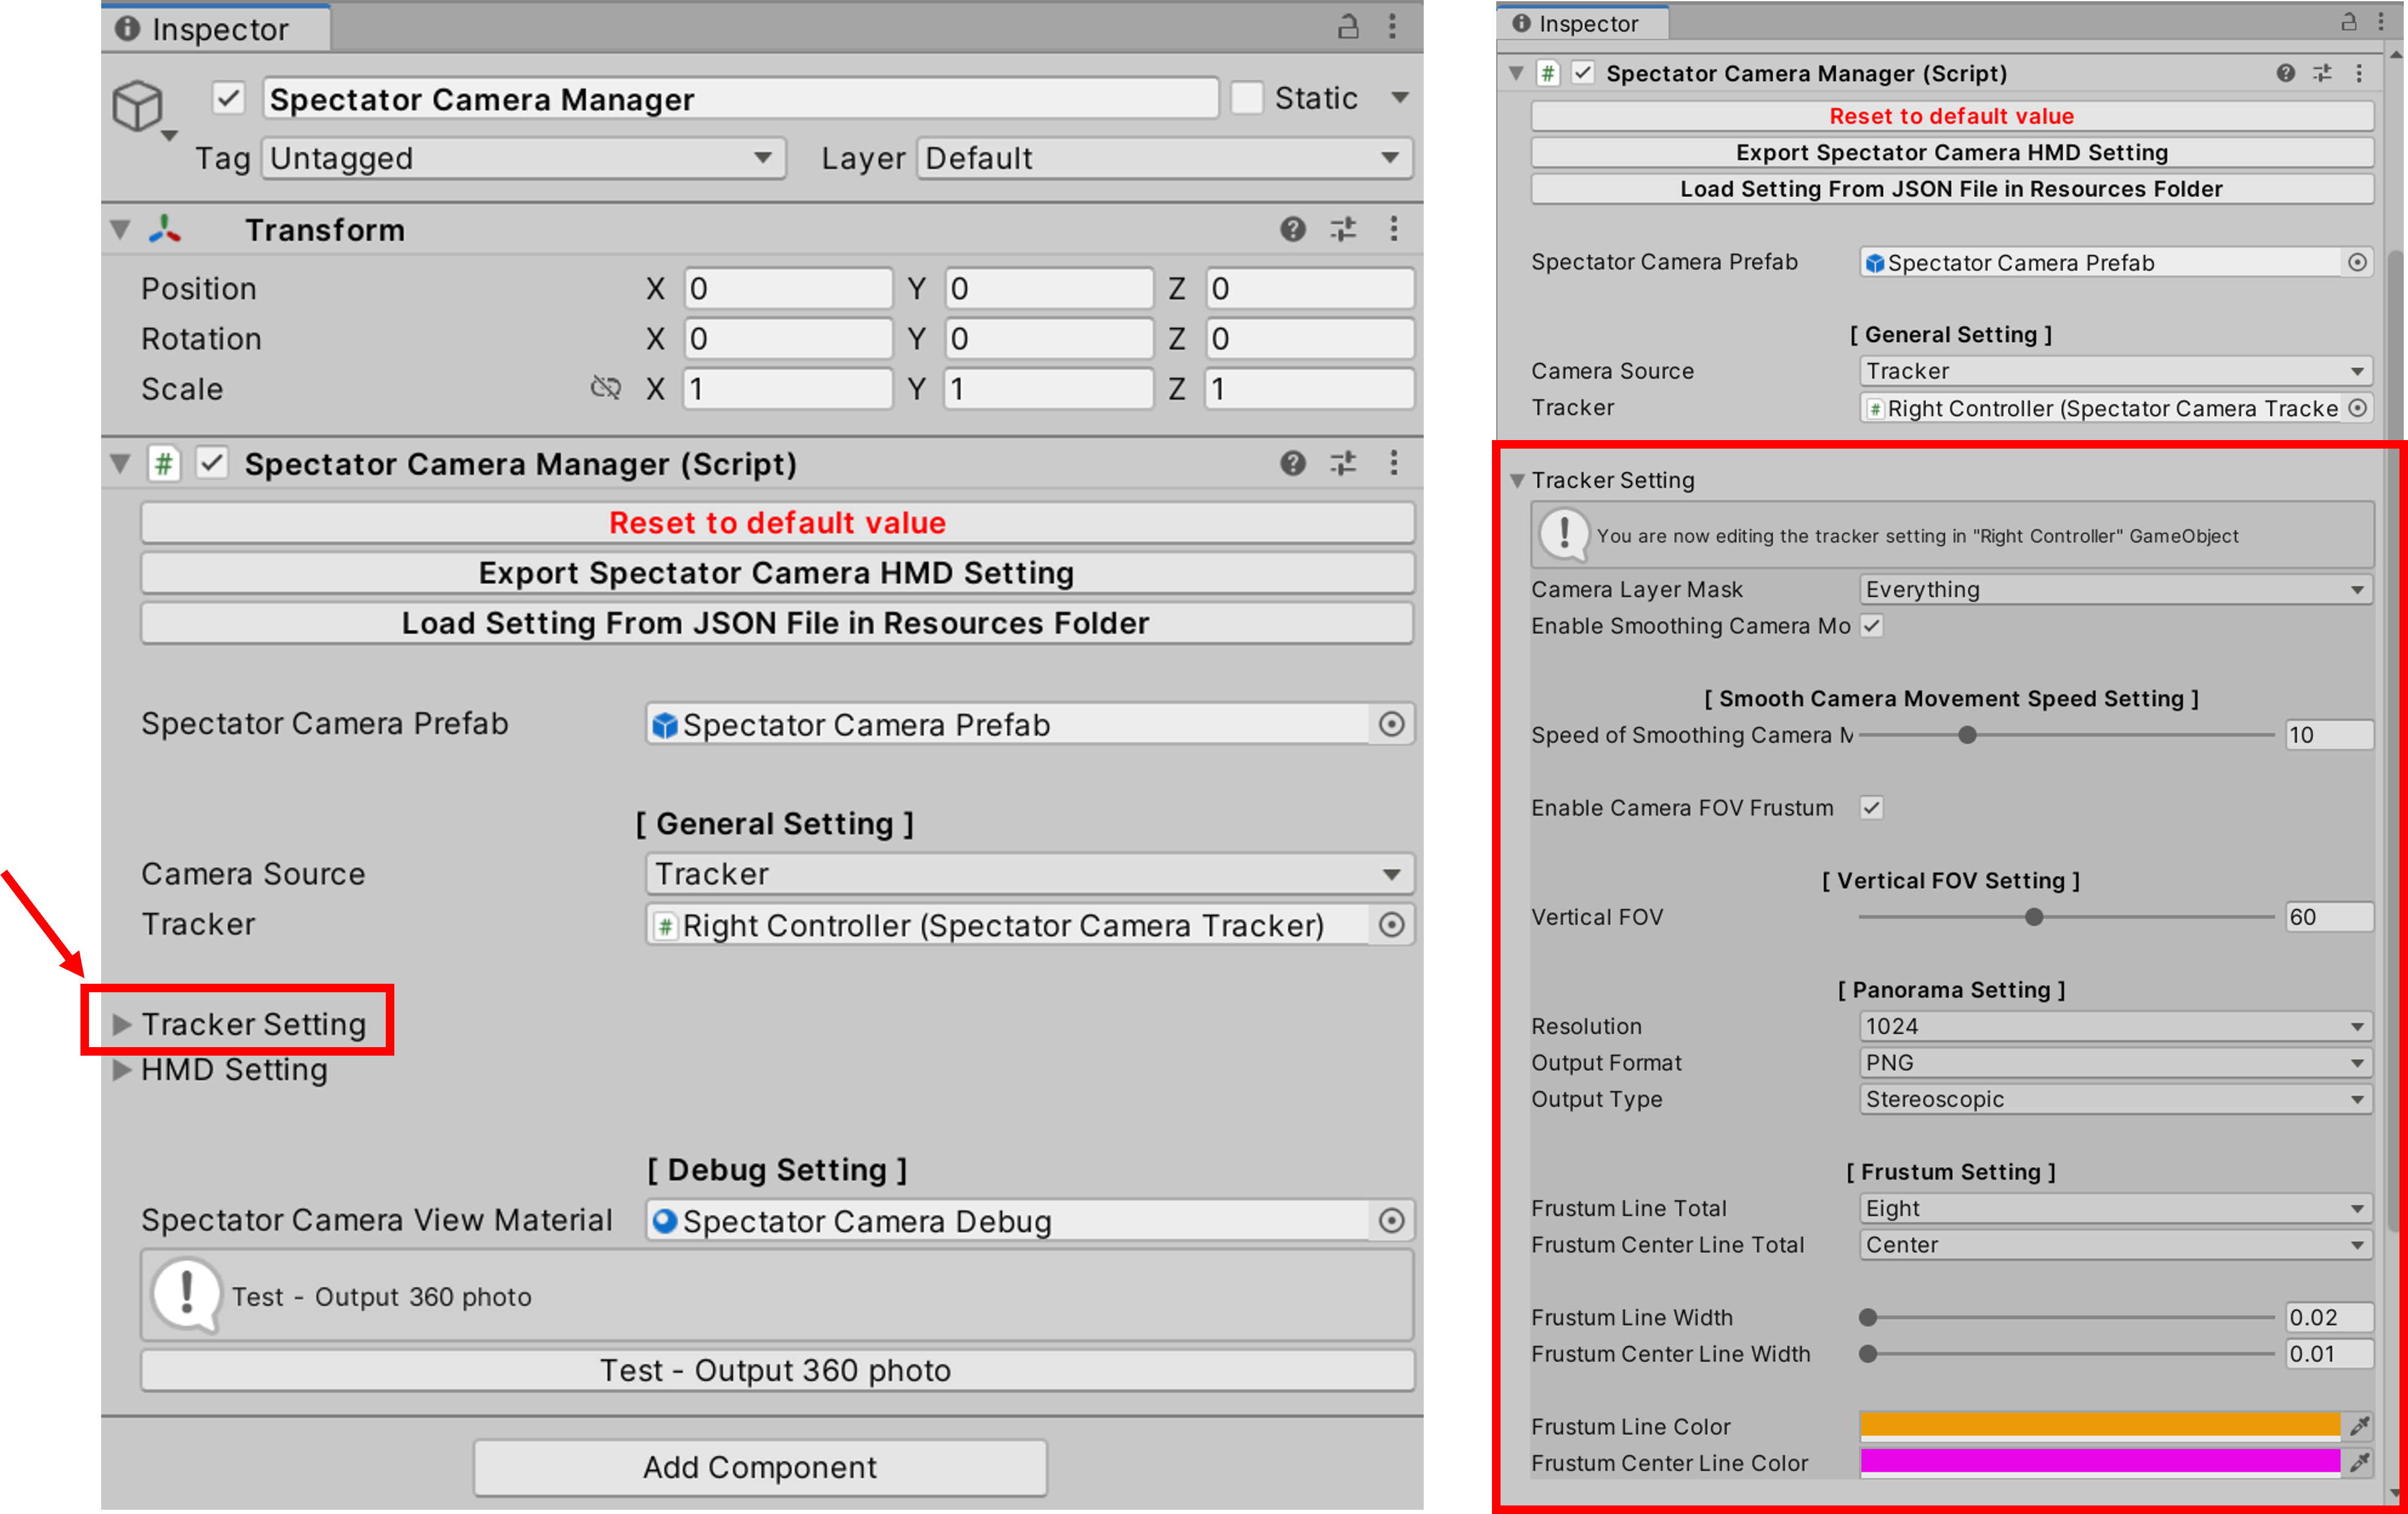
Configure the setting in the "SpectatorCameraManager" (It has a "Tracker Setting" region when you assign the "Tracker" field). Every tracker has its own setting that will apply to the spectator camera if it is a target tracked by the spectator camera.
Debug Setup
We also provide the debug flow and method for those of you who want to debug the spectator camera in the Unity Editor.
Step 1 . Assign the debug material
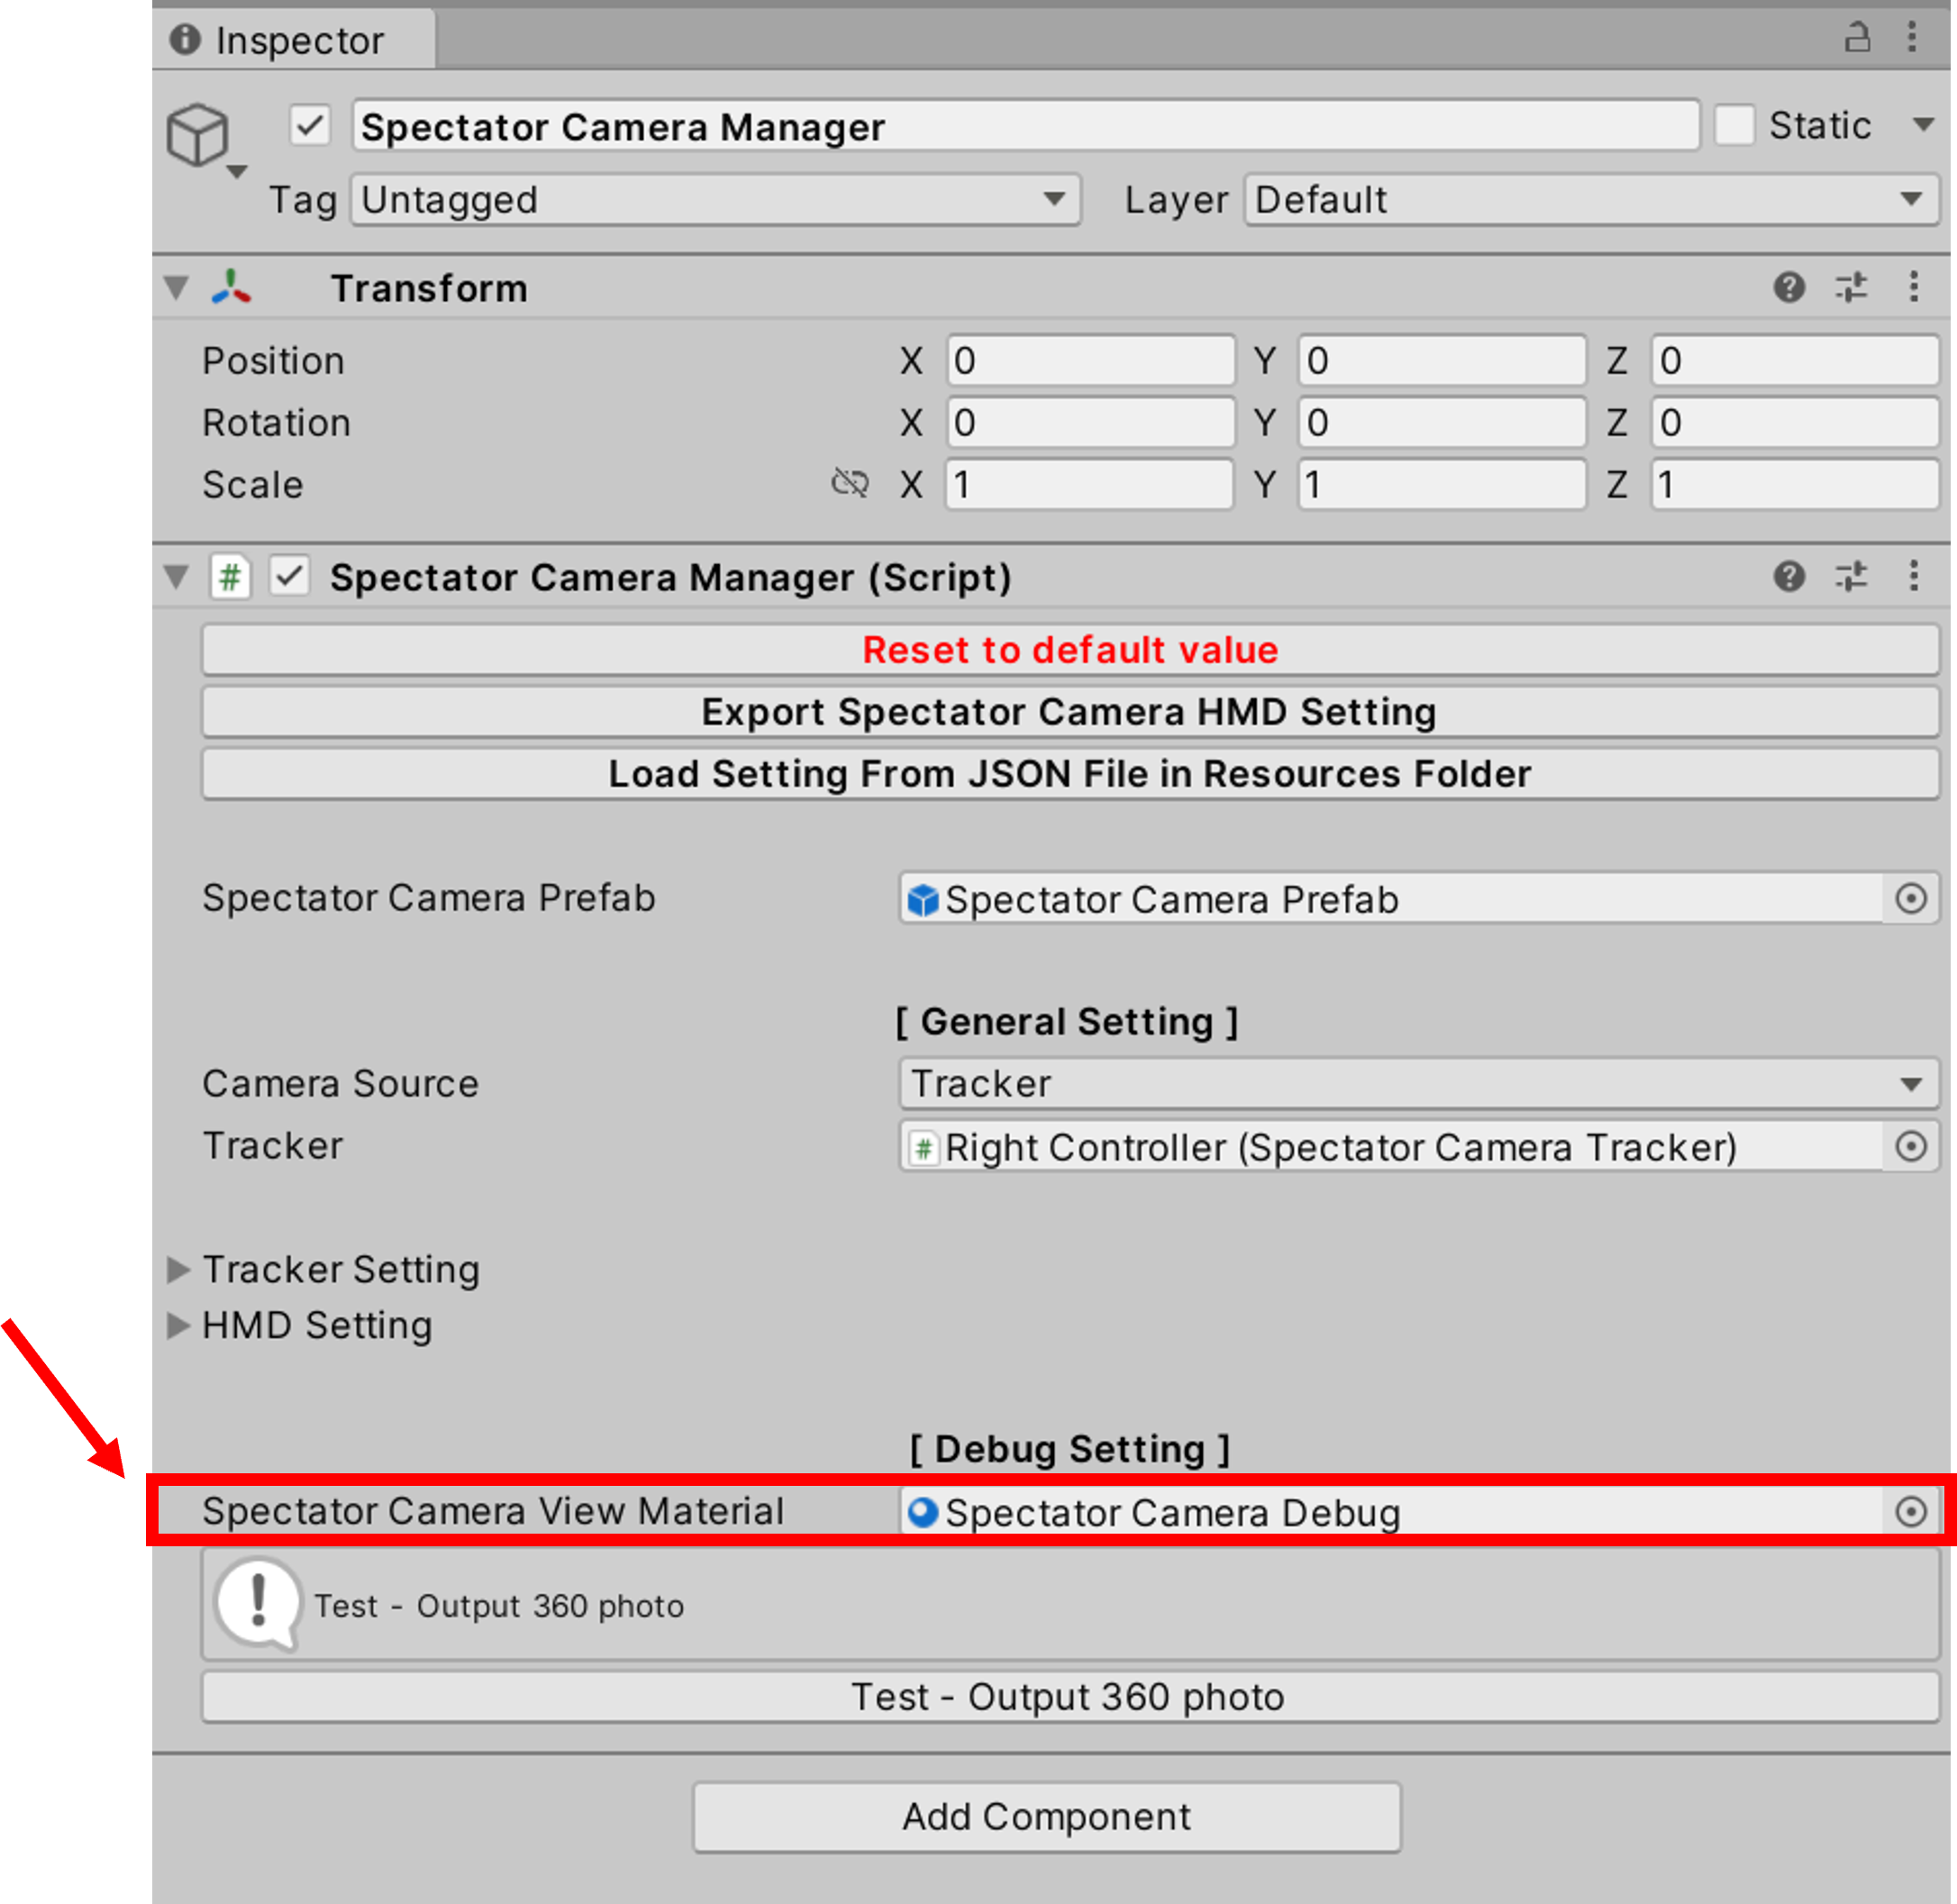
To preview the spectator camera view in the Unity Editor's play mode, drag a material to the "Spectator Camera View Material" field in the "SpectatorCameraManager".
Step 2 . Assign the material to an object
Assign the material to an object you want to show the spectator camera view when game playing.
Step 3 . Enable debug setting in Unity Editor's play mode
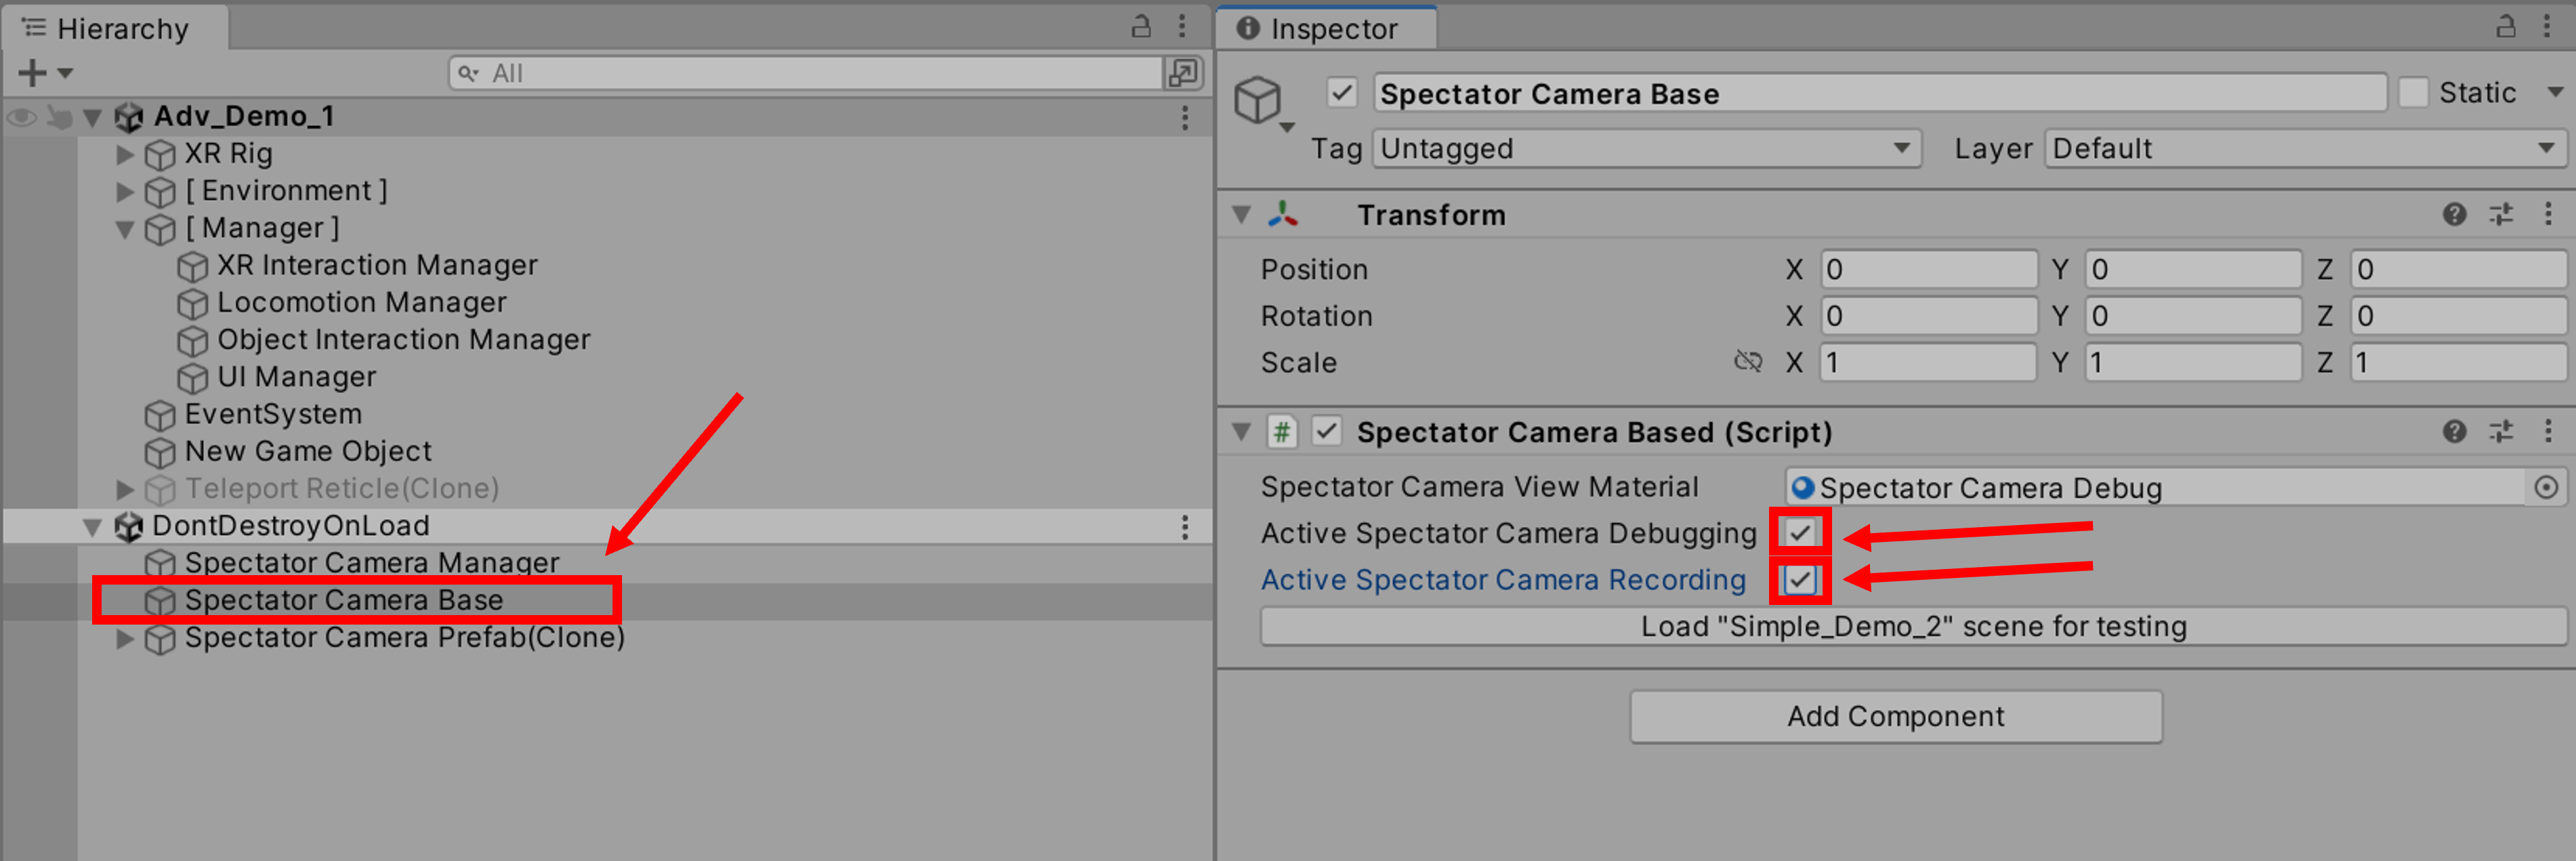
After entering the play mode, select the GameObject named "Spectator Camera Base" in the "Hierarchy" and then enable the two checkboxes "Active Spectator Camera Debugging" and "Active Spectator Camera Recording" in the "Inspector". In our sample, you can see the GameObject named "Spectator Camera Preview" showing the spectator camera view now.
Points to take note of and Known Issues
- This feature requires devices to have an up-to-date system version. Please update the device's system to the latest version.
- This feature is only available in Unity LTS version 2022.3.0f1 or above.
- The Spectator Camera does not support recording the composition layer.
See Also
Open source project
- XR_MSFT_first_person_observer and XR_MSFT_secondary_view_configuration extensions.