Getting Data of Facial Tracking
The Facial Tracking feature provided by VIVE OpenXR allows you to get the current facial expression of the player.
Supported Platforms and Devices
| Platform | Headset | Supported | Plugin Version | |
| PC | PC Streaming | Focus 3/XR Elite/Focus Vision | V | 2.0.0 and above |
| Pure PC | Vive Cosmos | V | 2.0.0 and above | |
| Vive Pro series | V | 2.0.0 and above | ||
| AIO | Focus 3/XR Elite/Focus Vision | V | 2.0.0 and above | |
Specification
This chapter will explore how to create more immersive experiences using the Facial Tracking feature within the Facial Tracking extension.
Hello, in this section, we are going to talk about how to get the data from the VIVE XR Facial Tracking feature. As you can see in the following picture, the Facial Tracking feature is merely a combination of Eye Expression and Lip Expression.
In VIVE XR Facial Tracking, the data from Eye Expression and Lip Expression are described with enums.
For example, the value associated with the enum XR_EYE_EXPRESSION_LEFT_BLINK_HTC tells how large the left eye of the player is opening. If the value is approaching to 1, it means the eye is closing, if otherwise, it means the eye is opening.
The same notion applies when we are using the data from Lip Expression. For example, the value associated with the enum XR_LIP_EXPRESSION_JAW_OPEN_HTC indicates how large the player's mouth is opening.
Environment Settings
Set up Your Project to use Facial Tracking
Before we start, if you haven't set up your project for running on VIVE devices using OpenXR, please go check Getting start with OpenXR.
- Check your VIVE OpenXR Plugin version

In Window > Package Manager, make sure your VIVE OpenXR Plugin is 2.0.0 or newer.
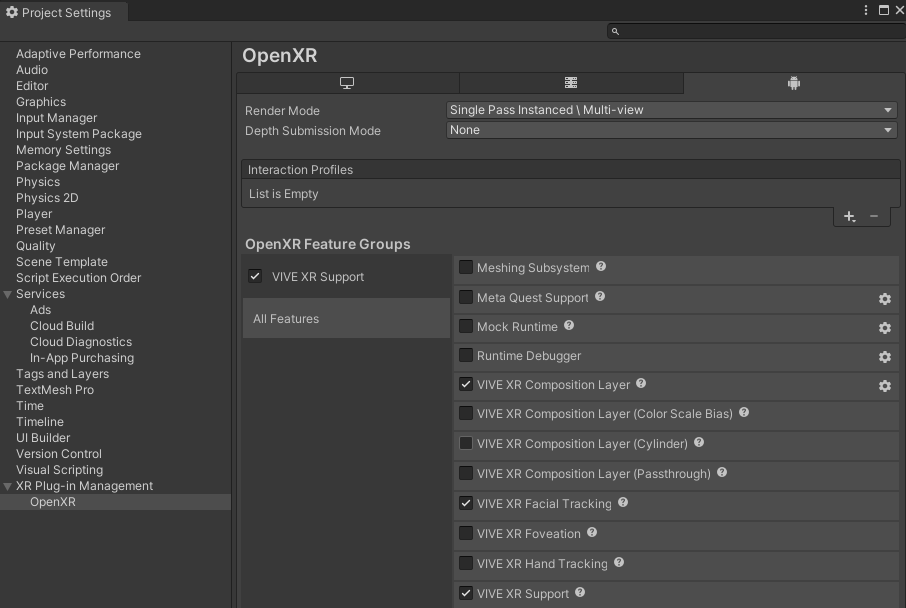
- Enable the Facial Tracking feature
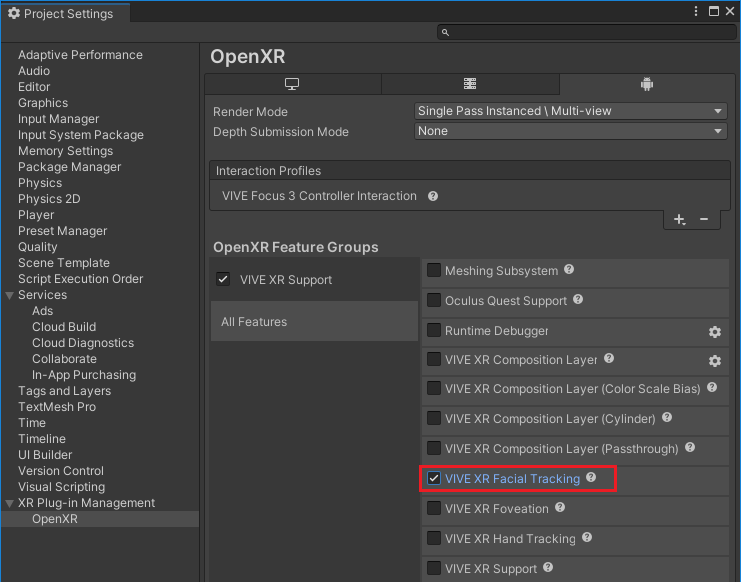
In Edit > Project Settings > XR Plug-in Management > OpenXR, enable the VIVE XR Facial Tracking feature.
Golden Sample
Therefore, as you can see, when we are trying to get the data from the Facial Tracking feature, what we are actually doing is to get the data from Eye Expression and Lip Expression simultaneously.
Now that we have a brief understanding of what the data provided by Facial Tracking provided represents, next, let's set up your project for Facial Tracking.
How to get the Data of Facial Tracking
Now that we have a brief understanding of what the data provided by Facial Tracking provided represents, and made sure that your project is all set, let me show you what we need to do in order to get the data.
P.S. You can also go check the API Reference of Facial Tracking here.
Step 1. Declare two float arrays of float to store the data from Eye Expression and Lip Expression
In any script in which you wish to get the data, prepare two arrays to store the data from Eye Expression and Lip Expression.
private static float[] eyeExps = new float[(int)XrEyeExpressionHTC.XR_EYE_EXPRESSION_MAX_ENUM_HTC];
private static float[] lipExps = new float[(int)XrLipExpressionHTC.XR_LIP_EXPRESSION_MAX_ENUM_HTC];
Step 2. Get the feature instance
To use the feature, get the feature instance with the following line of code
var feature = OpenXRSettings.Instance.GetFeature<ViveFacialTracking>();
Step 3. Put the data into the two arrays
Use the function GetFacialExpression to get the data and put them into the two arrays, eyeExps and lipExps.
    void Update()
        {
            var feature = OpenXRSettings.Instance.GetFeature<ViveFacialTracking>();
            if (feature != null)
            {
                // Eye expressions
                {
                    if (feature.GetFacialExpressions(XrFacialTrackingTypeHTC.XR_FACIAL_TRACKING_TYPE_EYE_DEFAULT_HTC, out float[] exps))
                    {
                        eyeExps = exps;
                    }
                }
                // Lip expressions
                {
                    if (feature.GetFacialExpressions(XrFacialTrackingTypeHTC.XR_FACIAL_TRACKING_TYPE_LIP_DEFAULT_HTC, out float[] exps))
                    {
                        lipExps = exps;
                    }
                }
            }

            //How large is the user's mouth is opening. 0 = closed 1 = full opened
            Debug.Log("Jaw Open: " + lipExps[(int)XrLipExpressionHTC.XR_LIP_EXPRESSION_JAW_OPEN_HTC]);
            //Is the user's left eye opening? 0 = opened 1 = full closed
            Debug.Log("Left Eye Blink: " + eyeExps[(int)XrEyeExpressionHTC.XR_EYE_EXPRESSION_LEFT_BLINK_HTC]);
        }
Integrate Facial Tracking with Your Avatar
Overview
- OpenXR Facial Tracking Plugin Setup.
1.1 Enable OpenXR Plugins.
1.2 Enable Facial Tracking extensions. - Game objects settings.
2.1 Avatar object settings. - Scripts for your avatar.
3.1 Add enum types for OpenXR blendshapes and your avatar blendshapes.
3.2 Add scripts for eye tracking.
3.2.1 Add scripts to Start function.
3.2.2 Add scripts to Update function.
3.2.3 Eye tracking result.
3.3 Add scripts for lip tracking.
3.3.1 Add scripts to Start function.
3.3.2 Add scripts to Update function.
3.3.3 Lip tracking result - Tips
1. OpenXR Facial Tracking Plugin Setup
Supported Unity Engine version: 2020.2+
*Note : Before you start, please install or update the latest VIVE Software and if you plan on streaming from your PC, check your SR_Runtime.
1.1 Enable OpenXR Plugins:
Please enable OpenXR plugin in Edit > Project Settings > XR Plug-in Management:

Click Exclamation mark next to \"OpenXR\" then choose \"Fix All\".


1.2 Enable Facial Tracking extensions
2. Game Objects Settings
2.1 Avatar Object Settings
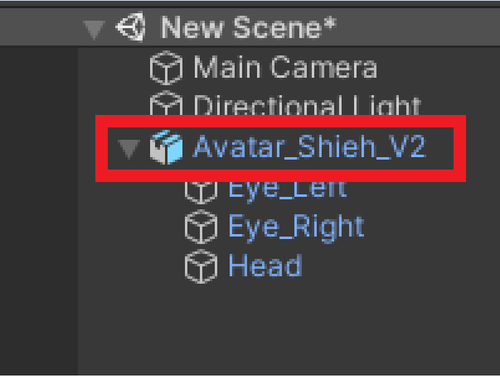
Import your avatar (Use the avatar provided by our FacialTracking sample as an example). Assets > Samples > VIVE OpenXR Plugin > {version} > FacialTracking > ViveSR > Models > version2 > Avatar_Shieh_V2.fbx
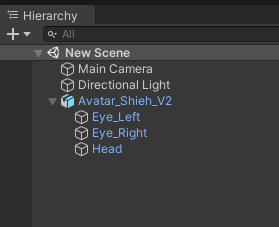
Note : It is recommended to negate the z scale value so that the avatar is consistent with the user's left and right direction.
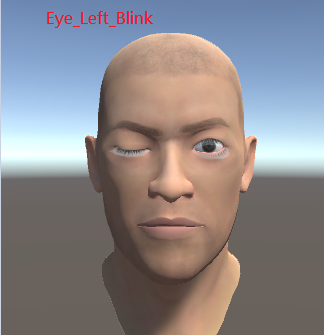
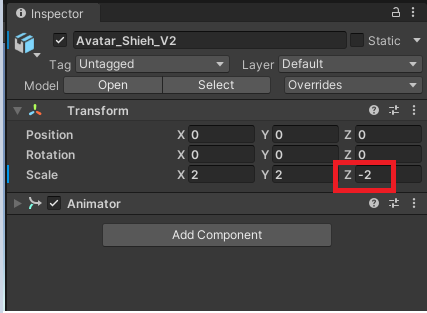
3. Scripts for your avatar
3.1 Add enum types for OpenXR blend shapes and your avatar blend shapes
Create new script which declares corresponding enum types as follows.
Your avatar blend shapes.

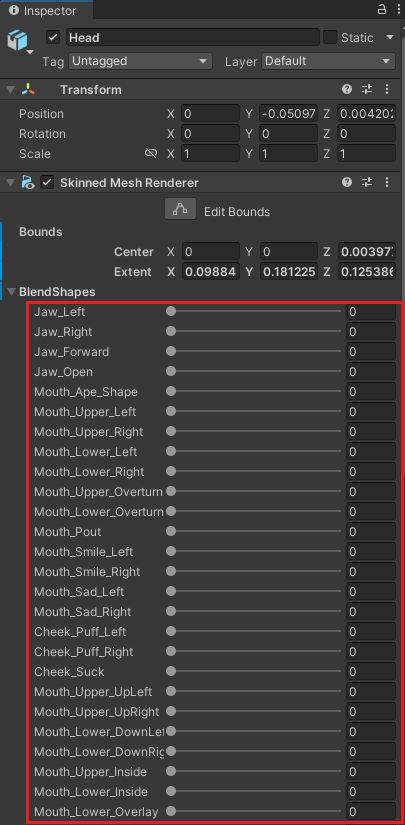
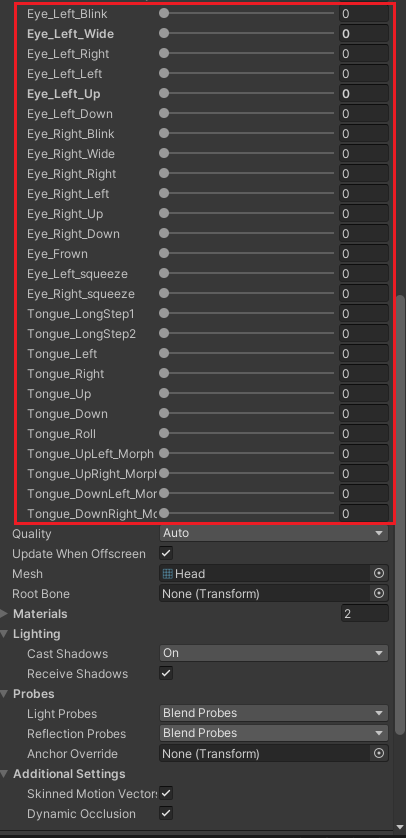
3.2 Add scripts for eye tracking
Create new script for eye tracking and add following namespaces to your script.
using VIVE.OpenXR.FacialTracking;
using System;
using System.Runtime.InteropServices;
Add the following properties:
//Map OpenXR eye shapes to avatar blend shapes
private static Dictionary < XrEyeShapeHTC, SkinnedMeshRendererShape > ShapeMap;
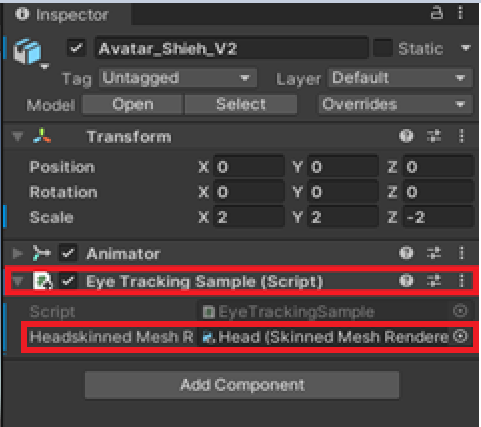
public SkinnedMeshRenderer HeadskinnedMeshRenderer;
private static float[] blendshapes = new float[60];
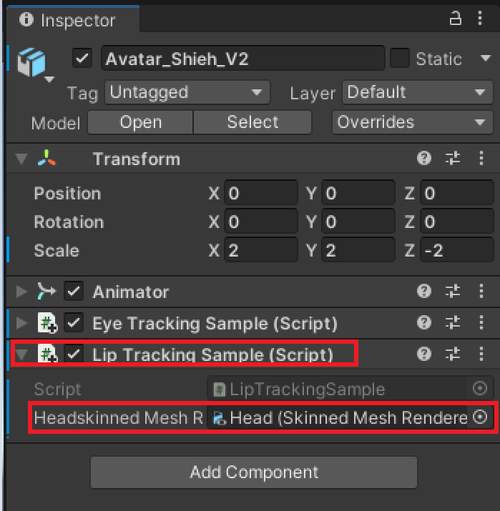
Attach it to your avatar and set options in inspector.
3.2.1 Add scripts to Start function
Step 1. Set the mapping relations between OpenXR eye shapes and avatar blend shapes.
ShapeMap = new Dictionary < XrEyeShapeHTC, SkinnedMeshRendererShape > ();
ShapeMap.Add(XrEyeShapeHTC.XR_EYE_EXPRESSION_LEFT_BLINK_HTC, SkinnedMeshRendererShape.Eye_Left_Blink);
ShapeMap.Add(XrEyeShapeHTC.XR_EYE_EXPRESSION_LEFT_WIDE_HTC, SkinnedMeshRendererShape.Eye_Left_Wide);
ShapeMap.Add(XrEyeShapeHTC.XR_EYE_EXPRESSION_RIGHT_BLINK_HTC, SkinnedMeshRendererShape.Eye_Right_Blink);
ShapeMap.Add(XrEyeShapeHTC.XR_EYE_EXPRESSION_RIGHT_WIDE_HTC, SkinnedMeshRendererShape.Eye_Right_Wide );
ShapeMap.Add(XrEyeShapeHTC.XR_EYE_EXPRESSION_LEFT_SQUEEZE_HTC, SkinnedMeshRendererShape.Eye_Left_Squeeze );
ShapeMap.Add(XrEyeShapeHTC.XR_EYE_EXPRESSION_RIGHT_SQUEEZE_HTC,SkinnedMeshRendererShape.Eye_Right_Squeeze );
ShapeMap.Add(XrEyeShapeHTC.XR_EYE_EXPRESSION_LEFT_DOWN_HTC, SkinnedMeshRendererShape.Eye_Left_Down);
ShapeMap.Add(XrEyeShapeHTC.XR_EYE_EXPRESSION_RIGHT_DOWN_HTC,SkinnedMeshRendererShape.Eye_Right_Down);
ShapeMap.Add(XrEyeShapeHTC.XR_EYE_EXPRESSION_LEFT_OUT_HTC,SkinnedMeshRendererShape.Eye_Left_Left );
ShapeMap.Add(XrEyeShapeHTC.XR_EYE_EXPRESSION_RIGHT_IN_HTC,SkinnedMeshRendererShape.Eye_Right_Left );
ShapeMap.Add(XrEyeShapeHTC.XR_EYE_EXPRESSION_LEFT_IN_HTC, SkinnedMeshRendererShape.Eye_Left_Right );
ShapeMap.Add(XrEyeShapeHTC.XR_EYE_EXPRESSION_RIGHT_OUT_HTC, SkinnedMeshRendererShape.Eye_Right_Right );
ShapeMap.Add(XrEyeShapeHTC.XR_EYE_EXPRESSION_LEFT_UP_HTC, SkinnedMeshRendererShape.Eye_Left_Up );
ShapeMap.Add(XrEyeShapeHTC.XR_EYE_EXPRESSION_RIGHT_UP_HTC ,SkinnedMeshRendererShape.Eye_Right_Up );
3.2.2 Add scripts to Update function
Step 1.: Get eye tracking detection results:
var feature = OpenXRSettings.Instance.GetFeature<ViveFacialTracking>();
feature.GetFacialExpressions(XrFacialTrackingTypeHTC.XR_FACIAL_TRACKING_TYPE_EYE_DEFAULT_HTC, out blendshapes)
Step 2.: Update avatar blend shapes
for (XrEyeShapeHTC i = XrEyeShapeHTC.XR_EYE_EXPRESSION_LEFT_BLINK_HTC; i < XrEyeShapeHTC.XR_EYE_EXPRESSION_MAX_ENUM_HTC; i++)
{
    HeadskinnedMeshRenderer.SetBlendShapeWeight((int)ShapeMap[i], blendshapes[(int)i] * 100f);
}
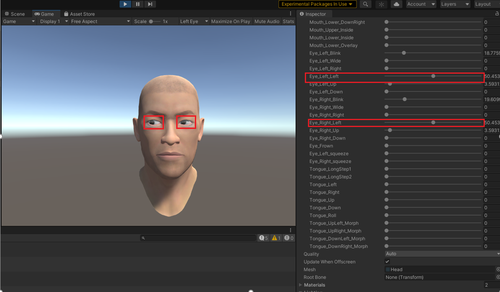
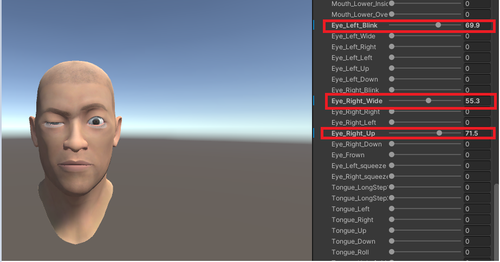
3.2.3 Eye tracking result:
3.3 Add scripts for lip tracking
Create new script for lip tracking and add following namespaces to your script.
using VIVE.OpenXR.FacialTracking;
using System;
using System.Runtime.InteropServices;
Add the following properties:
public SkinnedMeshRenderer HeadskinnedMeshRenderer;
private static float[] blendshapes = new float[60];
//Map OpenXR lip shape to avatar lip blend shape
private static Dictionary<XrLipShapeHTC, SkinnedMeshRendererShape> ShapeMap;
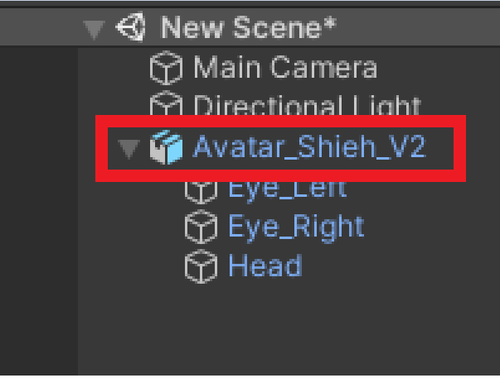
Attach it to your avatar and set options in inspector.
3.3.1 Add scripts to Start function
Step 1. Set the mapping relations between OpenXR lip shapes and avatar blend shapes.
ShapeMap = new Dictionary < XrLipShapeHTC, SkinnedMeshRendererShap> ();
ShapeMap.Add(XrLipShapeHTC.XR_LIP_SHAPE_JAW_RIGHT_HTC, SkinnedMeshRendererShape.Jaw_Right);
ShapeMap.Add(XrLipShapeHTC.XR_LIP_SHAPE_JAW_LEFT_HTC, SkinnedMeshRendererShape.Jaw_Left);
ShapeMap.Add(XrLipShapeHTC.XR_LIP_SHAPE_JAW_FORWARD_HTC, SkinnedMeshRendererShape.Jaw_Forward);
ShapeMap.Add(XrLipShapeHTC.XR_LIP_SHAPE_JAW_OPEN_HTC, SkinnedMeshRendererShape.Jaw_Open);
ShapeMap.Add(XrLipShapeHTC.XR_LIP_SHAPE_MOUTH_APE_SHAPE_HTC, SkinnedMeshRendererShape.Mouth_Ape_Shape);
ShapeMap.Add(XrLipShapeHTC.XR_LIP_SHAPE_MOUTH_UPPER_RIGHT_HTC, SkinnedMeshRendererShape.Mouth_Upper_Right);
ShapeMap.Add(XrLipShapeHTC.XR_LIP_SHAPE_MOUTH_UPPER_LEFT_HTC, SkinnedMeshRendererShape.Mouth_Upper_Left);
ShapeMap.Add(XrLipShapeHTC.XR_LIP_SHAPE_MOUTH_LOWER_RIGHT_HTC, SkinnedMeshRendererShape.Mouth_Lower_Right);
ShapeMap.Add(XrLipShapeHTC.XR_LIP_SHAPE_MOUTH_LOWER_LEFT_HTC, SkinnedMeshRendererShape.Mouth_Lower_Left);
ShapeMap.Add(XrLipShapeHTC.XR_LIP_SHAPE_MOUTH_UPPER_OVERTURN_HTC, SkinnedMeshRendererShape.Mouth_Upper_Overturn);
ShapeMap.Add(XrLipShapeHTC.XR_LIP_SHAPE_MOUTH_LOWER_OVERTURN_HTC, SkinnedMeshRendererShape.Mouth_Lower_Overturn);
ShapeMap.Add(XrLipShapeHTC.XR_LIP_SHAPE_MOUTH_POUT_HTC, SkinnedMeshRendererShape.Mouth_Pout);
ShapeMap.Add(XrLipShapeHTC.XR_LIP_SHAPE_MOUTH_SMILE_RIGHT_HTC, SkinnedMeshRendererShape.Mouth_Smile_Right);
ShapeMap.Add(XrLipShapeHTC.XR_LIP_SHAPE_MOUTH_SMILE_LEFT_HTC, SkinnedMeshRendererShape.Mouth_Smile_Left);
ShapeMap.Add(XrLipShapeHTC.XR_LIP_SHAPE_MOUTH_SAD_RIGHT_HTC, SkinnedMeshRendererShape.Mouth_Sad_Right);
ShapeMap.Add(XrLipShapeHTC.XR_LIP_SHAPE_MOUTH_SAD_LEFT_HTC, SkinnedMeshRendererShape.Mouth_Sad_Left);
ShapeMap.Add(XrLipShapeHTC.XR_LIP_SHAPE_CHEEK_PUFF_RIGHT_HTC, SkinnedMeshRendererShape.Cheek_Puff_Right);
ShapeMap.Add(XrLipShapeHTC.XR_LIP_SHAPE_CHEEK_PUFF_LEFT_HTC, SkinnedMeshRendererShape.Cheek_Puff_Left);
ShapeMap.Add(XrLipShapeHTC.XR_LIP_SHAPE_CHEEK_SUCK_HTC, SkinnedMeshRendererShape.Cheek_Suck);
ShapeMap.Add(XrLipShapeHTC.XR_LIP_SHAPE_MOUTH_UPPER_UPRIGHT_HTC, SkinnedMeshRendererShape.Mouth_Upper_UpRight);
ShapeMap.Add(XrLipShapeHTC.XR_LIP_SHAPE_MOUTH_UPPER_UPLEFT_HTC, SkinnedMeshRendererShape.Mouth_Upper_UpLeft);
ShapeMap.Add(XrLipShapeHTC.XR_LIP_SHAPE_MOUTH_LOWER_DOWNRIGHT_HTC, SkinnedMeshRendererShape.Mouth_Lower_DownRight);
ShapeMap.Add(XrLipShapeHTC.XR_LIP_SHAPE_MOUTH_LOWER_DOWNLEFT_HTC, SkinnedMeshRendererShape.Mouth_Lower_DownLeft);
ShapeMap.Add(XrLipShapeHTC.XR_LIP_SHAPE_MOUTH_UPPER_INSIDE_HTC, SkinnedMeshRendererShape.Mouth_Upper_Inside);
ShapeMap.Add(XrLipShapeHTC.XR_LIP_SHAPE_MOUTH_LOWER_INSIDE_HTC, SkinnedMeshRendererShape.Mouth_Lower_Inside);
ShapeMap.Add(XrLipShapeHTC.XR_LIP_SHAPE_MOUTH_LOWER_OVERLAY_HTC, SkinnedMeshRendererShape.Mouth_Lower_Overlay);
ShapeMap.Add(XrLipShapeHTC.XR_LIP_SHAPE_TONGUE_LONGSTEP1_HTC, SkinnedMeshRendererShape.Tongue_LongStep1);
ShapeMap.Add(XrLipShapeHTC.XR_LIP_SHAPE_TONGUE_LEFT_HTC, SkinnedMeshRendererShape.Tongue_Left);
ShapeMap.Add(XrLipShapeHTC.XR_LIP_SHAPE_TONGUE_RIGHT_HTC, SkinnedMeshRendererShape.Tongue_Right);
ShapeMap.Add(XrLipShapeHTC.XR_LIP_SHAPE_TONGUE_UP_HTC, SkinnedMeshRendererShape.Tongue_Up);
ShapeMap.Add(XrLipShapeHTC.XR_LIP_SHAPE_TONGUE_DOWN_HTC, SkinnedMeshRendererShape.Tongue_Down);
ShapeMap.Add(XrLipShapeHTC.XR_LIP_SHAPE_TONGUE_ROLL_HTC, SkinnedMeshRendererShape.Tongue_Roll);
ShapeMap.Add(XrLipShapeHTC.XR_LIP_SHAPE_TONGUE_LONGSTEP2_HTC, SkinnedMeshRendererShape.Tongue_LongStep2);
ShapeMap.Add(XrLipShapeHTC.XR_LIP_SHAPE_TONGUE_UPRIGHT_MORPH_HTC, SkinnedMeshRendererShape.Tongue_UpRight_Morph);
ShapeMap.Add(XrLipShapeHTC.XR_LIP_SHAPE_TONGUE_UPLEFT_MORPH_HTC, SkinnedMeshRendererShape.Tongue_UpLeft_Morph);
ShapeMap.Add(XrLipShapeHTC.XR_LIP_SHAPE_TONGUE_DOWNRIGHT_MORPH_HTC, SkinnedMeshRendererShape.Tongue_DownRight_Morph);
ShapeMap.Add(XrLipShapeHTC.XR_LIP_SHAPE_TONGUE_DOWNLEFT_MORPH_HTC, SkinnedMeshRendererShape.Tongue_DownLeft_Morph);
3.3.2 Add scripts to Update function
Step 1. Get lip tracking detection results:
var feature = OpenXRSettings.Instance.GetFeature<ViveFacialTracking>();
feature.GetFacialExpressions(XrFacialTrackingTypeHTC.XR_FACIAL_TRACKING_TYPE_LIP_DEFAULT_HTC, out blendshapes);
Step 2. Update avatar blend shapes
  for (XrLipShapeHTC i = XrLipShapeHTC.XR_LIP_SHAPE_JAW_RIGHT_HTC; i < XrLipShapeHTC.XR_LIP_SHAPE_MAX_ENUM_HTC; i++)
  {
      HeadskinnedMeshRenderer.SetBlendShapeWeight((int)ShapeMap[i], blendshapes[(int)i] * 100f);
  }
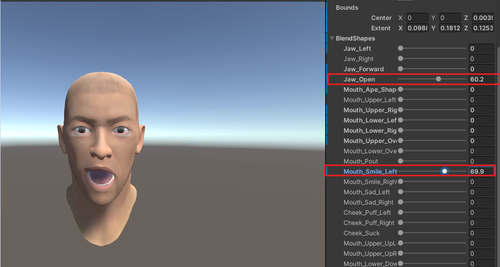
3.3.3 Lip tracking result:
4. Tips
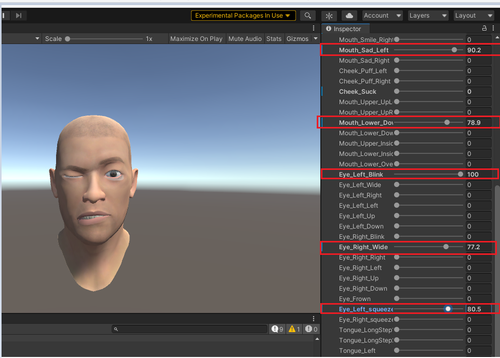
Tip 1: You can perform eye tracking and lip tracking on avatar at the same time to achieve facial tracking as shown below.
Tip 2: To let avatar be more vivid, you could roughly infer the position of the left pupil and update avatar by following blend shapes. The similar way can also apply to right pupil.
XR_EYE_EXPRESSION_LEFT_UP_HTC
XR_EYE_EXPRESSION_LEFT_DOWN_HTC
XR_EYE_EXPRESSION_LEFT_IN_HTC
XR_EYE_EXPRESSION_LEFT_OUT_HTC
For example: add below code to script of eye tracking.
Step 1. Add the following properties:
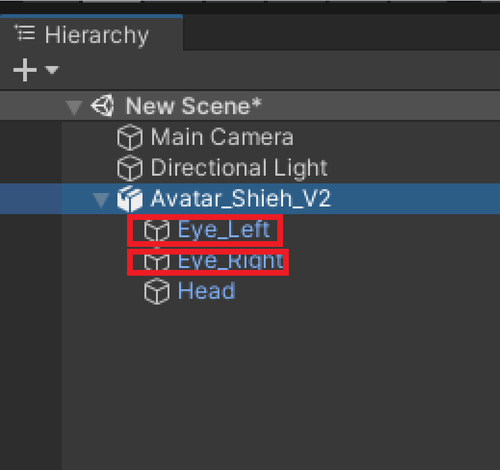
public GameObject leftEye;
public GameObject rightEye;
private GameObject[] EyeAnchors;
Step 2. Set options in inspector.
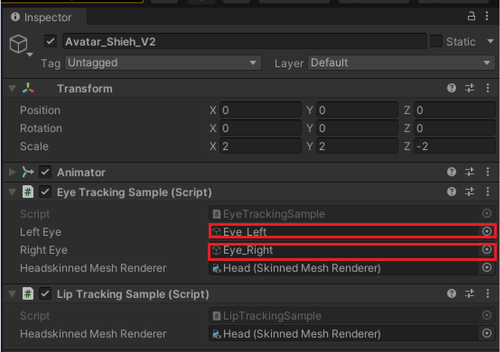
Step 3. Add lines in Start function to create anchors for left and right eyes.
EyeAnchors = new GameObject[2];
EyeAnchors[0] = new GameObject();
EyeAnchors[0].name = "EyeAnchor_" + 0;
EyeAnchors[0].transform.SetParent(gameObject.transform);
EyeAnchors[0].transform.localPosition = leftEye.transform.localPosition;
EyeAnchors[0].transform.localRotation = leftEye.transform.localRotation;
EyeAnchors[0].transform.localScale = leftEye.transform.localScale;
EyeAnchors[1] = new GameObject();
EyeAnchors[1].name = "EyeAnchor_" + 1;
EyeAnchors[1].transform.SetParent(gameObject.transform);
EyeAnchors[1].transform.localPosition = rightEye.transform.localPosition;
EyeAnchors[1].transform.localRotation = rightEye.transform.localRotation;
EyeAnchors[1].transform.localScale = rightEye.transform.localScale;
Step 4. Add lines in Update function to calculate eye gaze direction and update eye rotation.
Vector3 GazeDirectionCombinedLocal = Vector3.zero;
if (blendshapes[(int)XrEyeShapeHTC.XR_EYE_EXPRESSION_LEFT_IN_HTC] > blendshapes[(int)XrEyeShapeHTC.XR_EYE_EXPRESSION_LEFT_OUT_HTC])
{
    GazeDirectionCombinedLocal.x = -blendshapes[(int)XrEyeShapeHTC.XR_EYE_EXPRESSION_LEFT_IN_HTC];
}
else
{
    GazeDirectionCombinedLocal.x = blendshapes[(int)XrEyeShapeHTC.XR_EYE_EXPRESSION_LEFT_OUT_HTC];
}
if (blendshapes[(int)XrEyeShapeHTC.XR_EYE_EXPRESSION_LEFT_UP_HTC] > blendshapes[(int)XrEyeShapeHTC.XR_EYE_EXPRESSION_LEFT_WIDE_HTC])
{
    GazeDirectionCombinedLocal.y = blendshapes[(int)XrEyeShapeHTC.XR_EYE_EXPRESSION_LEFT_UP_HTC];
}
else
{
    GazeDirectionCombinedLocal.y = -blendshapes[(int)XrEyeShapeHTC.XR_EYE_EXPRESSION_LEFT_WIDE_HTC];
}
GazeDirectionCombinedLocal.z = (float)-1.0;
Vector3 target = EyeAnchors[0].transform.TransformPoint(GazeDirectionCombinedLocal);
leftEye.transform.LookAt(target);

if (blendshapes[(int)XrEyeShapeHTC.XR_EYE_EXPRESSION_RIGHT_IN_HTC] > blendshapes[(int)XrEyeShapeHTC.XR_EYE_EXPRESSION_RIGHT_UP_HTC])
{
    GazeDirectionCombinedLocal.x = blendshapes[(int)XrEyeShapeHTC.XR_EYE_EXPRESSION_RIGHT_IN_HTC];
}
else
{
    GazeDirectionCombinedLocal.x = -blendshapes[(int)XrEyeShapeHTC.XR_EYE_EXPRESSION_RIGHT_UP_HTC];
}
if (blendshapes[(int)XrEyeShapeHTC.XR_EYE_EXPRESSION_RIGHT_UP_HTC] > blendshapes[(int)XrEyeShapeHTC.XR_EYE_EXPRESSION_RIGHT_DOWN_HTC])
{
    GazeDirectionCombinedLocal.y = -blendshapes[(int)XrEyeShapeHTC.XR_EYE_EXPRESSION_RIGHT_UP_HTC];
}
else
{
    GazeDirectionCombinedLocal.y = blendshapes[(int)XrEyeShapeHTC.XR_EYE_EXPRESSION_RIGHT_DOWN_HTC];
}
GazeDirectionCombinedLocal.z = (float)-1.0;
target = EyeAnchors[1].transform.TransformPoint(GazeDirectionCombinedLocal);
rightEye.transform.LookAt(target);
Step 5. Results
